A Head Full of Fluff
You Will Need:
A ball of yarn (Double-twine or fluffy yarn, for best result)
A round loom (Less than $15 for a set at most art stores, in the knitting section)
A little knitting hook (Usually found in loom set)
Scissors
Ruler (I didn’t use one…but feel free to!)
A round loom (Less than $15 for a set at most art stores, in the knitting section)
A little knitting hook (Usually found in loom set)
Scissors
Ruler (I didn’t use one…but feel free to!)
Step 1: Tie a slip knot at the end of the yarn! If you do knot (pun intended) know how to do this, check out this link: http://www.wikihow.com/Make-a-Slip-Knot (If you have a lot of trouble with the step, just loop it tightly over the peg. The slip knot is just there to make sure the yarn stays in place.)
Step 2: Tighten the slip knot onto the knob sticking off to the side!
Step 3: Cast yarn onto all the pegs. This part seems complicated, but it’s not! Bring the yarn up from the sideways knob, slip it through the first two pegs. Going to the right, bring it around the peg, all the way. You should be back behind the peg. Carry it on to the next peg, and repeat the same step. Continue.
Step 4: Press the completed loops down to the bottom of the pegs. Repeat step 3. You should have two separate lines of loops on each peg, now.
Step 5: Pick up the hook, now! Slip it under the bottom loop of the first peg. Carefully use it to lift this bottom hoop OVER the top one. Complete this for all pegs. Now repeat step 4 (including the “Repeat step 3”).
This is going to continue for a while.
Tip: Sometimes, to avoid the yarn unlooping itself during the beginning of Step 5, I go clockwise instead of counterclockwise when I use the hook to carry the bottom loop over. If you have trouble with the yarn unlooping itself a little, try doing it this way!
Step 6: Periodically measure the length of your hat. Suggested length is 7-8 inches. I usually carry on a little further, because I want the hat to fully cover my ears.
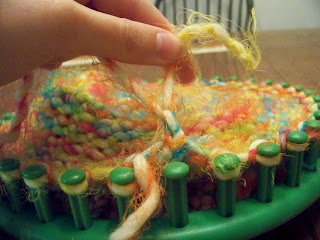
Your hat is going to look like this while on the loom:
This is the inside of the hat! (Or it will be, eventually.)This will be the outside! (Eventually =P)
Step 7: Once the hat is at a desirable length, cut the yarn about four or five inches from the hat.
With the yarn left in the original pile/roll of yarn, cut off a length of about twelve inches.
If you want to make this part a little longer, that’s fine.
Step 8: Use the hook to scoop the first loop of yarn on the loom. Lift it over the peg. Using the loose strand
of cut yarn, slip it through the loop. Continue on to the next peg. Make sure the loose strand of yarn doesn’t
leave any of the loops! You want both ends of the yarn to meet when you get to the end of the circle.
Step 9: Your hat should be off the loom now. There should be three loose strands of yarn on top. Take
these, and pull them to the INSIDE of the hat. Tighten them until the top of the hat is fully closed, and then
knot them all together until you’re confident that your hat will stay in one piece. Cut the excess off.
Step 10: The bit of yarn at the hem with the slip knot should still be there. Loop it around a stitch in the hat
and it off. Cut the excess yarn.
Voila! You have your very own hat!!!


No comments:
Post a Comment