
So I tried something new the other night – I painted glasses! As in the drink-from glasses, not the balance-on-your-nose-and-ears glasses. It was reasonably cheap, and they came out super awesome! I’ll probably just use them as decoration, but they’re dishwasher safe ;)
What You’ll Need:
A glass item of some sort (I chose a martini glass and a wine glass because of the stems. I also bought both at the dollar store.)
Glass paint (You can find this at art stores, usually in the same aisle as the bottled acrylic paint.)
Paint brushes
Wire (I used 20 gauge. The lower the number, the thicker the wire. The thinner wires break easily, so keep that in mind!)
Beads (Whatever colors you want, make sure they fit on the wire)

(The plant is not necessary. It adds to the picture though, don't you think?)
Okay, so first things first. Wash the glass items! I know most people will snort and refuse this step, but honestly it will make the paint go on nicer. And you won’t be trapping nasty dust particles between the paint and glass.
Are your glass items washed?
If so, then on to this step: begin painting! =D I know, it’s easier said than done. But here are a few tips: Don’t paint too close to the rim of the glass. You want to be able to sip from the glass without drinking paint. Also, don’t paint on the inside of the glass. I hope that one was kind of obvious. If you don’t know what to paint, here are a few ideas!
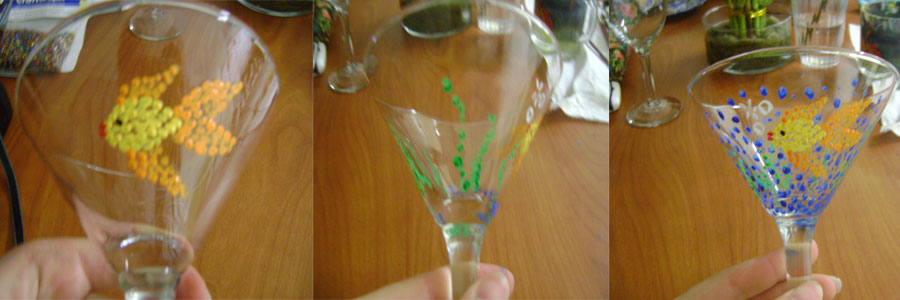
- · A fish! (I did this one!)
- The fish in three steps - yellow oval, orange fins, and then two red dots as lips and one black dot for an eye! Wavy green lines = seaweed. Blue dots, thicker at bottom, more sparse at top = water!
- · Flowers
- · Peace signs (I also did this one!)

- · Words (I wrote: Happiness, Peace, and Love on the Peace sign glass!)
- · Colorful dots (or hearts- I separated the words with tiny blue hearts for the peace sign glass =P)
- · Designs
- · Leaves
- · Shoes
- · Paw prints
- · Etc.
I painted using dots, mostly because it gave me an excuse not to be too detailed.
THIS STEP IS IMPORTANT
You have to WAIT. I don’t mean you have to wait for it to dry, I’m saying wait about 2 days, unless your glass paint has different directions on it. When the allotted amount of waiting time is up, there are more directions. However, there is something you can do in the mean time!
Cut off about a foot, maybe a foot and a half if you want it to cover most of the stem, of wire. Twist one end into a small, temporary loop, so the beads don’t fall off. Begin dropping on the beads. I used mostly smaller beads, with a bigger one dropped in every now and then, just to add to it. Twist another loop at the opposite end of the wire, once you’re done beading it. Put these strands of beads aside. They will go on the glasses later. (Note: These bead strands can really only be used for the glass items with stems! Thus, the reason I used a martini glass and a wine glass. If you used, say, a bowl or plate the beads will not work!)

 (For the fish, thus the little shell beads. I don't suggest them. They don't lay quite right on the foot of the glass :( )


When your glass items are ready for the oven, put them in. This means DO NOT preheat your oven. That would be a bad thing. Just put your glasses in, turn the oven up to 325, and set the timer for ten minutes. When the buzzer goes off, take your glasses out and wait for them to cool down. The paint is now dishwasher safe.
Unloop one of the wire-loops, and reloop it around the bottom of the stem. Start twisting the beaded wire up the stem, around and around. At the top, unloop the temporary loop, and reloop it around the top of the stem. Voila! Cute little glasses :)

No comments:
Post a Comment