Sunday, April 24, 2011

Colors Make Me Happy (Especially in skirt form)


Hey there, people, let me be the first to say Happy Easter, if it is a holiday you celebrate!  If it is not, than Happy Random April Sunday to you!  So, I know I haven’t been posting on “odd days” lately, but it’s because odd days are just so inconveniently busy by some cruel joke dictated by the universe.  But that being besides the point, here’s a craft I randomly started working on about two or three weeks ago with the support of the ever-awesome Shelby who I miss and have not seen since then.  I don’t have many photos because I was more worried about not putting it down and losing interest than in documenting, so sorry about that!


What you will need:
  • Fabric squares (I find these in the calico/quilting section in art stores.  I’m not talking about the little ones, but the ones that are about 1.5 times larger than a bandana.)
  • Note: The number of fabric squares you want depends on multiple things.  For example, the width of your hips and behind, and the length you want the skirt to be.  I used 13 squares – 1 White (for the band), 1 Red, 1 Orange (they were nearer the top and therefore I needed less), 2 Yellow, 2 Green, 2 Light Blue, 2 Dark Blue (Indigo doesn’t exist anymore??? Excuse me for believing in all seven colors of the rainbow.), and 2 Purple.
  • Elastic (I used ¾ of an inch wide.  Look at the length and decide if it’s appropriate for you, and while ¾ width is okay, I suggest going about an inch.  Of course, I decided this after I finished sewing my skirt.)
  • Thread (You can match your threads if you want…I just used white.)
  • Sewing machine (Or just a needle and tons of patience.)
  • Scissors

Step 1: Cut your fabric squares in half or into four lines so you have long strips instead of squares.  Sew matching colored strips together so you have longer strips of the colors.  To do this, sew the ends FACE TO FACE so the hem is on the inside.  Use that tactic throughout this tutorial.  The hem would look silly on the outside for this particular design.  Here’s a paint diagram of what it should look like (obviously multiply by 2 if you cut into four strips and not just in half.  I used four strips for my skirt.):

Etc.

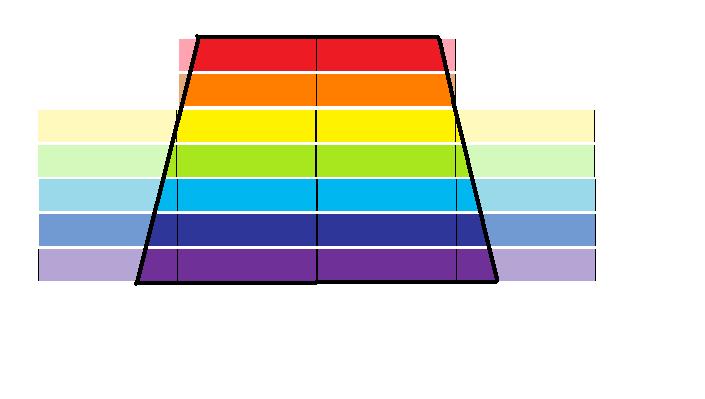
Step 2: Sew these strips together in the order you want (I did the order of the rainbow).  Match the center seams together so the shorter strips are centered.  Do not sew the white strip (or whatever color you chose your band to be) with this. New paint diagram:

Note: I chose for the purple on the bottom of mine (not demonstrated in this diagram) to be longer than the length of the other colors.  When you sew the strips together, it should be front to front so the hem is on the inside.  Trim the excess.  To make the purple longer, sew the line closer to the end of the fabric, so there’s less excess to trim.

Step 3: Cut the fabric in a bell-like shape, demonstrated by this paint diagram:


Note: The top band should be able to wrap around your waist or hips (wherever you want the skirt to sit) at least 1.5 times.  I think mine was closer to 2 times, but I plan on trimming it down just a little.  So basically, aim for about 1.5-1.75 times the length of cloth you would need for a flat skirt!

Step 4: On the bottom of the skirt, fold up the fabric towards the inside, just a little.  Sew this all the way around the skirt to hem the bottom, partially so it has a clean look, and partially so it doesn’t thread.  Hems are multi-purpose, in case you didn’t know :P

Step 5: Sew the white strip (or whatever you color you chose the band to be) to the top of the skirt, face to face so the hem is on the inside.  This part is kind of hard – fold the white over (towards the inside) until you have just enough room for your elastic band.  Don’t make it too exact or small, because you need to thread the elastic through.  Sew the white cloth down, but DO NOT sew the ends shut.

Step 6: Measure the elastic around your hips or waist (this is where you’ll want the skirt to sit) and cut it so it’ll be snug but not too tight.  Start feeding it through the white-cloth-tunnel you just made.  Hold onto one end so it doesn’t disappear into the fabric!  When you have both ends sticking out of cloth, sew them together as stably as you can.  Pull the white band together over the elastic, and sew the ends of that together too, and continue sewing down the sides of the skirt so it’s all together now, face to face.  Your skirt should look something like this:


Step 7:  Flip the skirt right side out and spread the scrunched material around the elastic as evenly as you can.  Voila!  You have a rainbow-quilt skirt now :)


Good luck with this project! (And in case you were wondering, this is the first clothing item I’ve made without a pattern!  Patterned clothing pictures below, just because I’m proud of them :P )
This is the first thing I made with my sewing machine. I've made like ten million aprons since!
This is the first dress I made!

-Bonnie

Friday, April 15, 2011

Cinnamon-y Goodness


I know most people, when asked what their favorite cookie is, will say chocolate chip or sugar or peanut butter…(or thin mints, and yum.)  Until last year I probably would’ve said sugar.  Now, though?  Snickerdoodles.  Hands down, no joke.  I love me some cinnamon cookies.  Here’s the recipe I use, in case you’ve never tried them! 

What you will need:
½ cup of butter
1 ½ cups of flour
1 cup of sugar
1 egg
½ tsp. of vanilla extract
¼ tsp. of baking soda
¼ tsp. of cream of tartar

AND
2 tbsp. of sugar
1 tsp. cinnamon

Optional:
Milk-chocolate Hershey kisses


Step 1:
 In a medium to large bowl, beat butter until it’s soft.  I usually stick it in the microwave to melt it first, or leave it out sitting to soften if I think that far ahead.  Add ¾ of a cup of flour, the cup of sugar, the egg, the vanilla extract, the baking soda, and the cream of tartar.  Stir up.  Add the other ¾ cup of flour.  Put this mixture in the fridge and chill it for one hour!  During this time I usually do something entirely unproductive, i.e. watching horror movies with my roommate and skipping past the super tense scenes because we’re both chickens.  


Step 2:
Preheat oven to 375 degrees Fahrenheit.  In a little bowl, mix the 2 tbsp. of sugar and the cinnamon.  Take the dough out of the fridge and roll into small-ish balls.  Dip them (only one side or the cookie will stick to the pan) into the cinnamon-sugar mix.  I usually indent the top and sprinkle extra sugar and cinnamon in.  Put these raw snickerdoodle balls onto an ungreased cookie sheet.


Step 3:
Bake these cookies (at 375) for 10 to 11 minutes.


Step 4: (OPTIONAL)
As soon as you remove the cookies from the oven, press a milk chocolate kiss right into the middle and let them sit.  When I do this, I usually stick them in the freezer for about five – ten minutes, but not always.  Unfortunately, I don’t have any pictures of the cookies with kisses on them, mostly because I didn’t have any kisses on me.  But they are pretty delicious =P
In case you were wondering, I just bought this to store all of my experimental/family recipes in :)


Enjoy the best cookies ever!
-Bonnie

Wednesday, April 6, 2011

This Apple Fell Far From the Tree!


Here’s a fun (not) story – I went to Publix on Saturday and bought some fresh fruit.  Among the fruit, I found a bag of apples.  Yum, right?  Wrong.  It turns out most of them were bruised.  So, instead of throwing them out, I decided to do something with them!

My friend, Logan, named these "Far Out Mini Pies" or "FOMP" because of the "apple doesn't fall far..." quote.  So, I'm sticking with it :)
What will you need to make a dozen FOMP, you ask?  


Apples (haha, duh, right?  I suggest half a dozen.  It’s a good, sturdy number.  I used Gala apples.)
1/8 tsp. (I love saying “tisp”) of All Spice
1/2 tsp. of Cinnamon
3/4 cup of Sugar
3 tbsp. Flour
1 Package of pre-made pie-crust dough
Butter
Vanilla Ice Cream
Cupcake pan 

Step 1:
Preheat oven to 375 degrees F.  While it’s preheating, mix the All Spice, Cinnamon, Sugar, and Flour in one bowl.  Put this bowl aside for now.


Step 2:
Grease a cupcake pan.  Unroll the dough, and cut out medium-large circles.  I used a cup to cut my circles!  Put each little circle over a cupcake spot, and press it down to form it to the greased pan, as demonstrated in the pictures below.


Step 3:
Chop up the apples!  I did this part one apple at a time, because I wanted to only use as many apples as I had to.  You can see in the pictures that I used smaller chunks, mostly because they’re easier to squish into small (cupcake-sized) places.  Using the mixture from step 1, drop the apple chunks into the bowl and cover them in the mix.  Scoop out the apple chunks and pack them into the dough-formed cupcake holders!  (By the way – smell your hands after this step, if you used your hands to do the dunking.  Yum, right?  I would love to go around smelling like Christmas all the time.)


Step 4:
If there’s leftover powder, sprinkle it over the pies.  Take a small slice of butter and put over each pie.  This will add just a tad flavor, and keep the top moist.  Cover the pan with tinfoil.  This will help the apples cook all the way through.  (And we like fully cooked apples!)


Step 5:
My roommate randomly decided to feed my fish here.  If you have a pet that needs to eat, please feed him, her, or them, at this time.


Step 6:
Put the tin-covered cupcake-pies into the over (which should be preheated by now) for 25 minutes.  I was going to put mine in for a little longer, but when I pulled them out after the 25 minutes, I realized they were cooked pretty well.  Check yours.  If they need to be in for a little longer, place them back in the oven.  It helps if you close the oven door, too ;) 


Step 7:
After the pies have cooled a bit, scoop them out of the cupcake pan and onto plates.  I used a serving spoon to do this.  (I’m in a college dorm, I have to be inventive.)  Put them on a plate or something. (Something because for all I know, you’re inventive too.)  Anywho, now comes the fun part!!!!!


Step 8:
 When serving these pies, put a scoop of ‘nilla ice cream on them!!!!  Yuuuuummmmm.  If you didn’t figure it out, this is the part where you eat them!!!!!! (Also, look at the adorable ice-cream scoop!  I love penguins almost as much as I love sheep and my cat, Keca.)


Also, my roomie helped me out with this project, which was fun.  I didn’t use a recipe for this, it was mostly a collaboration of my own baking experiences and my mom’s told-you-so apple pie ingredients.  It was nice getting to try something new with Laura (said roomie).
"Roomie" A.K.A. Laura