Monday, October 22, 2012

It's the Bridal Showdown...

Just kidding, it's not really a showdown.  However, it does have to do with wedding and bridal stuff :)  As has been referred to in past posts, Shelby is soon to be married.  Like, really soon.  You know what that means?  A lot of last minute crafts.  A lot of them.  So many.  But it's cool, because we're really getting to do new and exciting things!

Now, this past weekend was Shelby's (south) Bridal Shower, since there was a handful of us down here in Florida who couldn't make it to the original Bridal Shower with her family up north.  I was in charge of games and entertainment and Cindy, a family friend, hosted the shower at her house and supplied a wonderful, beautiful menu.  My problem was that because Shelby had already had one shower, I didn't want to repeat games she may have played already.  I had trouble finding nicely set-up games that were appropriate for the forum, so in the end I worked with a mix of game ideas I found online and some that I made up from board games or ideas I had heard about at some point.  This post is to outline the six games we played so the next maid-of-honor who needs to plan a shower doesn't have to risk the dangers of the unexplored internet.

Game 1: Steal the Veil!
Start this game at the very beginning of the shower.  Everybody gets a metal ring, similar to binder ring clips, with five strips of tulle.  If you've seen those DIY tutu posts on pinterest, you'll know how to do this.  If not, it's super simple: fold the strip in half and put one end through the metal ring.  Fold the loose ends through the loop the folded side of tulle forms, and tug it tight.

Everyone can attach this to their sleeve or necklace or pant loop - whatever is the most convenient.  Choose 3 "Forbidden" words.  Each time during the shower that someone uses one of those words, the person who catches them saying it gets one of their "veils."  At the end of the shower, whoever has the most wins!  (Our forbidden words were "Cruise," "Josh," and "Wedding."  Shelby totally lost.  Josh's mom won.)

Game 2: Bridal Bingo!
This one is pretty self explanatory.  Make a 5X5 board.  Each square in the grid gets a word related to the wedding or couple.  Make sure each party attendee has a board that is DIFFERENT from the others, so the words should all be in another square.  I'll add the 6 boards that I made below.  Print out one extra board to cut up and stick in a bag to use as the calling cards.  You'll see that there is a ring around the "I Do" square on these boards.  We used those as the freebies.


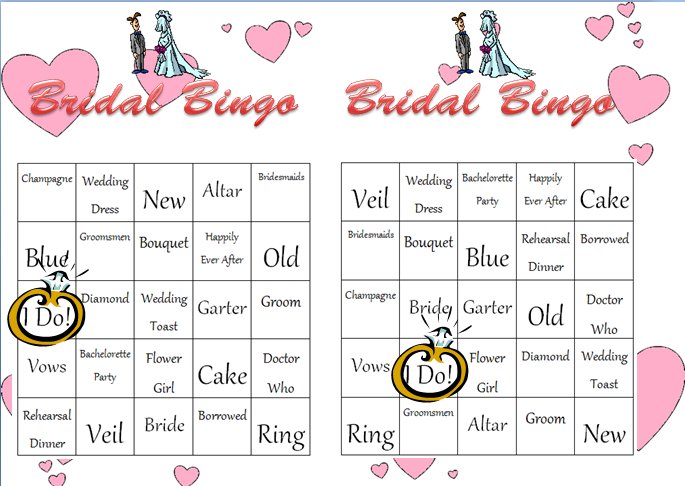
I printed these on nicer photo paper to make them a little fancier, and I cut out squares of three different shades of pink scrapbook paper the size of each grid piece to cover the words that were called.  This ended up being a hit, and we played it more than once.

Game 3: Wedding Scategories!
I chose 9 wedding/love related categories and typed them up on a pretty graph in Microsoft Word.  At the shower, we had Shelby pick a random letter (she chose "J") and we all had one minute to try to fill in the 9 categories with something starting with that letter.  Afterword, we all compared answers, and in the end the person who had more different answers than everyone else won.


Game 4: Bride or Groom?
For this one, I went on Facebook and copied/pasted random status messages from Shelby and Josh going as far back as I possibly could to make it really hard.  I kept one sheet of paper that said who said what, my cheat-sheet to grade everyone else's answers, and then took out anything that specified gender or name from the status messages.  I arranged them in a chart with two check boxes beside each status message so the attendees could mark who they thought posted it.  Below is an example of the sheet I used.


I added a couple extra status messages on my cheat sheet in case there needed to be a tie-breaker, but Shelby won (only by 1 point) so it wasn't necessary :)

Game 5: Pass the Bouquet!
Think Hot Potato, but without the hot potato.  I bought a little bundle of flowers and wrapped them in a pretty silver tulle with some nice ribbon to make it look like a wedding bouquet.  We all sat in a circle and the tossing of the bouquet began - to anyone in the circle.  I played "Marry Me" by Train on my iPod and paused it randomly.  The person holding the bouquet was out, and the circle closed in until only one person was remaining.  Cindy was the winner with the bouquet!  I'll make sure to add pictures later, because it was quite fun :)

Game 6: Wedding Pictionary!
For this game, I made a list of wedding/couple related words.  I printed the list and cut it into strips, mixing it up in a plastic baggie.  We had some dry-erase markers and a white board set up at the front of the room.  Shelby started the game by pulling a slip of paper from the bag and drawing it on the board until we guessed what it was.  The person who guessed got to pull the next slip of paper and go up to draw, and so on so forth.  I'll add pictures of this later, too, but for now here's the list we used:


And that, my dear readers, is the sum of our Bridal Shower games!  I'll make another post soon with the DIY game prizes, because they were a HUGE success.  If you're planning a wedding, or planning a shower, I wish you the best of luck :)

-Bonnie


Sunday, June 10, 2012

Lost and Found


Hey everyone, it’s Bonnie again (I know it's been ages)!

So it’s been a while since I’ve even had a chance to craft at all, what with working full time, being a full time student, and working on an art commission that literally takes up more space than me, but I had a desperate need to craft today.

See, here’s the deal: I like accessories.  I LOVE necklaces and earrings, especially.  My problem?  That I can never find what I want when I need it, and when I do it’s always tangled up in everything else.  I finally decided to solve the problem using this super fast, super easy craft.

What you will need:

You don't actually need a cat for this project.
  •  An unframed corkboard (whichever size you prefer)
  • Fabric (Enough to cover the corkboard and a little over each edge)
  • Stapler and Staples
  • Push-pins
  • Necklaces
  • Ribbon (Optional)
  • Glue (Optional depending on your presence or lack of ribbon)
  • Scissors
  • 2 long nails
  • Hammer
  • Wall space (Not optional)
Okay, so Step 1!:

Lay the fabric as flatly as possible over the front of the corkboard.  Trim the edges of the fabric, but try to leave about an inch and a half to fold over.  Flip the cork board upside down.

You can't see the corkboard, but I promise it's there.

Step 2:

Fold the fabric as neatly as possible, and try to keep it snug.  Open the stapler so you can lay it flat on the corkboard.  Press down (hard, otherwise the staples won’t always go in) near the edge of the corkboard, over the fabric.  Make sure the staple went in all the way as you go.  In an attempt to make sure the fabric was definitely being held in, I stapled along the back edge about every four to five inches.  Where the fabric was folded over twice (at the corners) I used about twice that.

Keca supervising the dangerous part

I'm building suspense by only showing you the back of the corkboard.
 
Step 3 (optional):

Once the fabric is nice and tight and connected to the corkboard, flip it over so the front is facing you again.  Cut an amount of ribbon that will border each side of your corkboard.  Using glue (I used memory glue, but fabric glue and probably even Elmer’s glue will work just fine) edge the fabric and then flatten the ribbon over it, trimming the edges if they’re just a little too long.  Your board should be looking super pretty about now!

I'm still building suspense by not showing you the whole picture.

Suspense ended.

Step 4:

Decide how you want to organize your necklaces, and put in your push-pins accordingly.  I really liked this part because I was starting to get excited about putting the corkboard up on my wall.  And also because I used lime green push-pins.

(I don't have a picture for this because the lime green push pins are slightly transparent and they blend right into the fabric...)

Step 5:

Put the corkboard against the wall, and in one top corner, place the nail and bang it through the wall using your hammer or tool of choice.  Make sure the corkboard is even, and then go to the other top corner and smash in the second nail.  The nails went through the cork board and the wall super easily for me, and it’s holding up really well.

(I also don't have a picture for this because it would have looked remarkably similar to the previous picture...but on a wall, not a rug.)

Step 6:

Hang up your necklaces!!!  I can’t find all of mine yet (which is no surprise because I lose just about everything), but you can see that not only does this make a good storage for jewelry, and a good organizer, it also makes a pretty sweet decoration.

I really am excited about it.  It holds up even my heaviest necklaces, and it looks great :)

Next, I plan on doing a smaller one for my earrings with a small plastic or metal tub beneath it to catch earrings in the event that they fall off…because if they fall behind one of my bookshelves, I’m never getting them back!  If I do manage, I'll add on a picture and an extra tutorial, if necessary :)

 Happy crafting!


Wednesday, February 29, 2012

Artwork Make-over

I know it's been a long time since either of us have posted, and I could definitely bore you of the details of school and work and wedding planning, but instead, I'm going to show you a tutorial, and explain how I get my inspiration.


I've followed a few craft blogs before, but not many. And during my little "hiatus" I discovered Pinterest. Pinterest is one of those things that if you never knew about it, you would go about your daily life, never realizing that you are missing out on a world of inspiration. I have to admit, I'm on Pinterest every day, some times multiple times a day, and I love sifting through all the crafts on the DIY & Crafts board. I've gotten so many wonderful ideas from the Food & Drink board, too! So you can look forward to a few tutorials from crafts I've seen on Pinterest!


This particular craft really caught my eye just as Bonnie and I were leaving for JoAnn's, and I decided I would try it, if I had the time. Who would have thought it would be one of the best crafts I've ever done? And seriously? One of the easiest! The original project was Song Lyric Wall Art / D.I.Y Project. Her's turned out so cute, I just had to try it myself! She did a tutorial on it, but instead of using liquid white paint, I used spray paint, and it turned out wonderful!


Supplies Needed:

  • Painting
  • Letter Stickers (I got mine from the scrapbooking section)
  • White (or another color) Spray Paint
  • Patience

First, take a painting (I picked mine up at JoAnn's, on clearance, for under $5).


Next, cut out the letters and place (without sticking) on the painting to get the exact positioning right!
We ran out of h's, so we had to improvise! Doesn't look too bad, does it?


Now, begin sticking the letters straight onto the painting! But, make sure you don't press them down too hard, you're going to be peeling them off in a little bit! And, as you can see, we used a straight edge to get perfect lines throughout.


Get ready to spray paint! Make sure all the stickers are exactly where you want them to be.


And then take the painting out to a well-ventilated area and begin spraying! I sprayed in circles, mostly, then came back to the areas afterwards that needed a little more lovin'.


After you're finishing spraying, let the paint dry, but not completely. We waited about ten minutes, and used the time to catch up with each other! Then, carefully begin peeling the letters off. Having long nails really helps with this part!


Honestly, not all of the letters are going to come out absolutely perfect, and as you can see the picture above, there were some remenants of the letters, but you can go back afterwards, and peel those off, too! After you're finished peeling, marvel at your new artwork!


I'll be framing this beauty in a few days, I'm really looking forward to putting it up! Oh, and, as always, thanks for stopping by!