Monday, January 31, 2011

Short... But, Oh, So Sweet

Hey everyone, it's Shelby! The past few days have been pretty hectic for me but, as always, they've been very good! Bonnie and I went to a Bridal Show yesterday (along with the Fiance and his Momma!) and it was so fun! It was the first Bridal Show any of us had been to, so it was definitely a brand new experience. Lots of vendors, lots of other Brides and free goodies! We had this Almond Cake with Chocolate Kahlua frosting that was SO DELICIOUS, even the Fiance loved it, and he's usually so picky! Anyways... Because I haven't had much time, and because I don't have much time tonight, (I have my first day of work at a new job tomorrow!) I won't be doing a tutorial today, but I will be showing you some of the things I've done lately!


First off is a Rosette necklace, adapted from Craftify It! I'll post a link to it at the end of this post!


It's definitely one of the easiest crafts I've made in a very, very long time! Well, except for this next craft...


Super simple (and super adorable!) tray! I've noticed a lot of blogs featuring something called "Mod Podge", and I had never heard about it... But, let me tell you something: It's amazing.


I bought the tray, scrapbook paper (the hearts), the paint, and the Mod Podge all from Hobby Lobby, for super cheap, most on sale! I then painted the tray brown (just a few coats), cut out the hearts, and Mod Podged (is that the right past tense?) them away! It's still not quite done, I'm going to paint the bottom brown and possibly Mod Podge some more hearts on to the sides or something!

Hopefully, I'll find some extra time this week to feature a real tutorial for you to enjoy! Until then, have an odd day! (Get it? Hehehe) Oh! And I'm linking up to: Craftify It

Saturday, January 29, 2011

Turning 2-D

It’s Bonnie again!
I had a super cool project lined up for recycled jeans, but lo and behold…I have no jeans in need of being recycled at the moment.  So I’m holding onto that idea.  Instead, learn how to cartoonize yourself without risking a virus on your poor computer!

You will need:
Colored pencils
Pencil sharpener
Regular pencil (I used mechanical)
Paper
Pen (preferably a thin black one that dries quickly!  You don’t want it to smear!)

What’s that?  Your pencil sharpener isn’t a super cool walking dinosaur?  That’s okay, a regular one will do.

Step 1: These steps are all in pencil!
Draw a circle!  Or a roughly circular shape! And section that circle off into quarters (using this + shape).  On the bottom, centered, draw two vertical lines.  (Don’t make them too long or you’ll look like a giraffe!) At the bottom of those lines, slope lines down slightly at a horizontal angle (unless you have straight shoulders, in which case draw rigid lines going straight out.)
It should look like this so far:


Step 2: At the horizontal line in the circle, draw two eyes.  There should be room between the two (or a little less) for roughly one more eye, just so you know the proportions.  If you don’t know how to draw eyes, here’s a quick tutorial:


Tip: Make the shape different if your eyes are a different shape!  Don’t be afraid to play around with the lines.  And if you’re drawing a male, I would suggest not adding the eyelashes.

Step 3: Draw the nose underneath the eyes, centered on the vertical cross line.  I usually draw cartoon noses as a flattened-looking “u”. 

Here are other noses you can use instead, for different styles and looks:


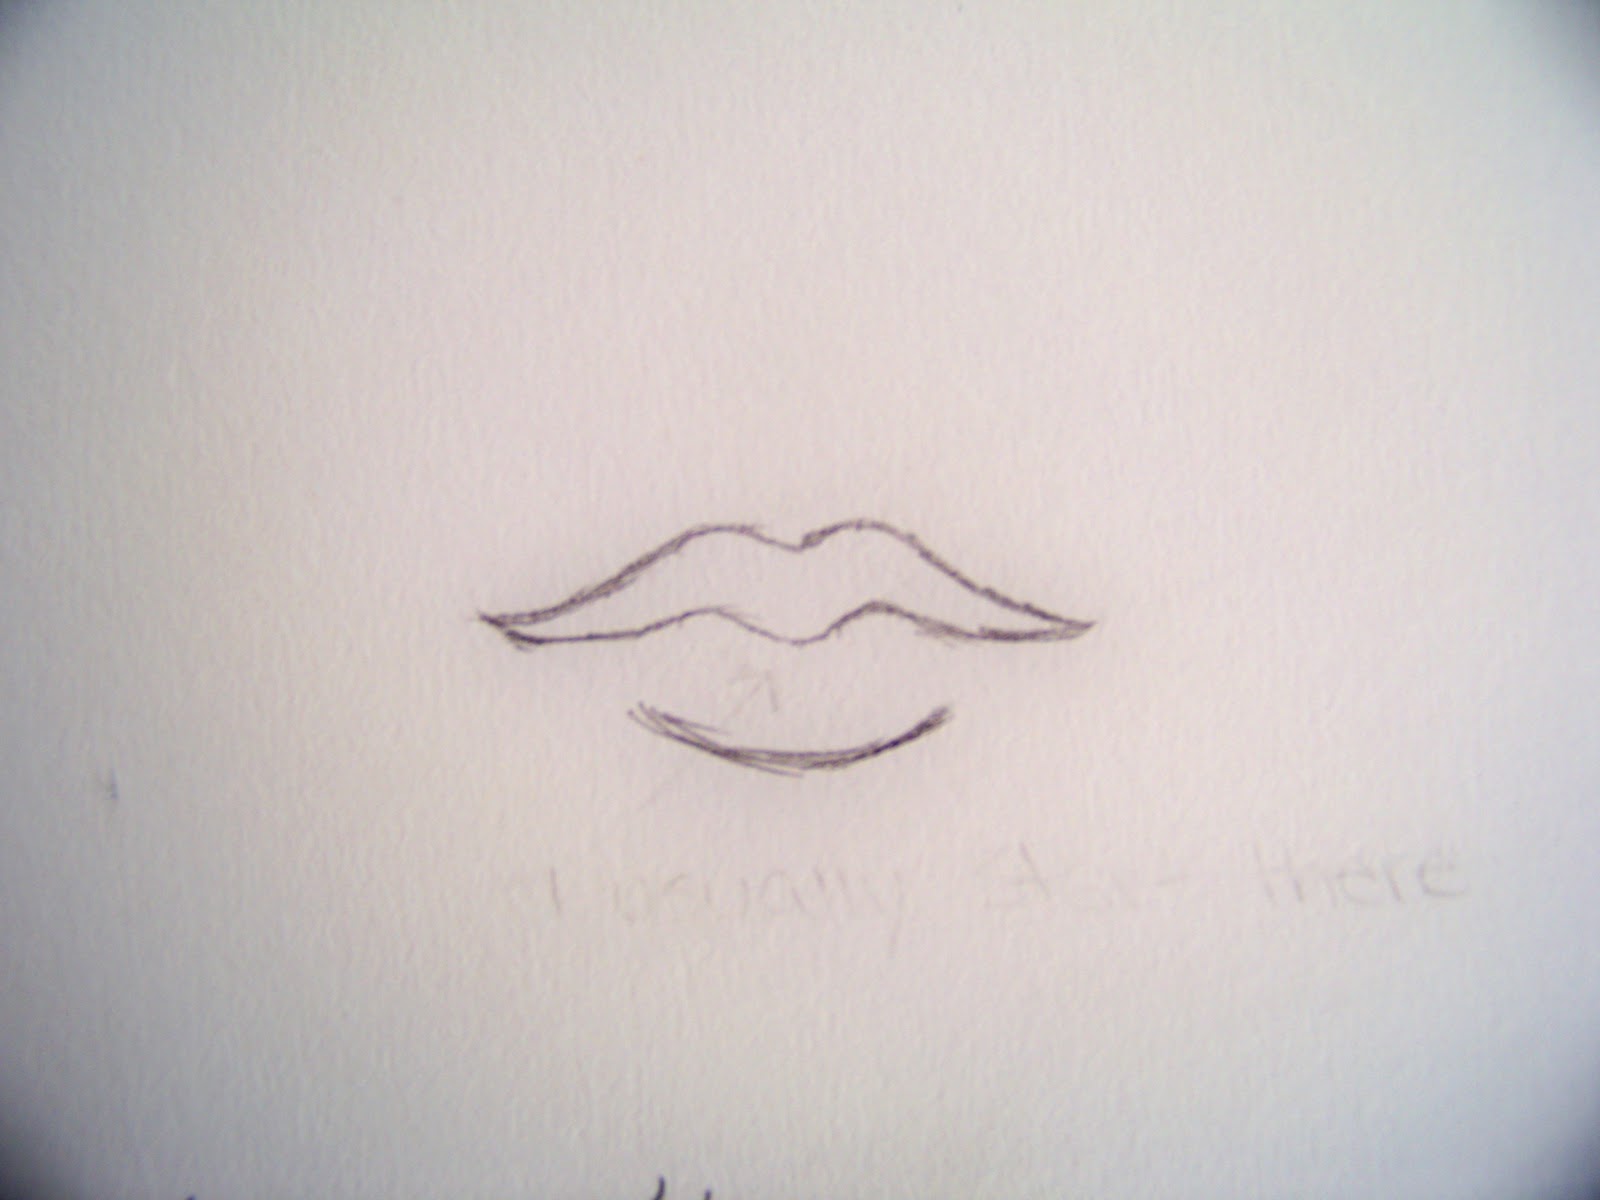
Step 4: Draw the mouth!  This should be centered by the vertical cross line as well.  I always start at the middle of the center line of the lips.  Then I add in the top, also starting at the middle.  (The arrow is pointing to where I started.)  


Lastly, I add in the bottom lip.  I don’t connect this to the upper lip usually.  Instead, I just draw the rounded line to signify that that’s the bottom of the mouth.  The fuller your lips, the rounder the lines should be.  If you are drawing a male, the lips should be straighter and less defined.
 
Tip: You’ll notice my lips are kind of edging outside of the circle.  That’s fine, because you still have to add in the chin.

 Step 5: Draw the chin, cheeks, and eyebrows!  I try to use a narrow chin, usually, and then round it into the cheeks.  The chin goes below the circle, the cheeks should sort of follow the circle.  If you are drawing a male, make these lines more square and straight.  The eyebrows totally depend on your own eyebrows!  If you have very expressive eyebrows, draw them super curved.  I have straight eyebrows.  Thus, I drew them straight.

Step 6: Sketch in the bangs!  I start where my bangs separate, a little bit below the top line of the circle.  I have a side part, so I start over the right eye.  After that I sketch in the other side.
If you don’t have bangs in your face, sketch the shape of how you keep them out, just don’t use the jagged lines like I did!

This is where you start with the hair.  I draw a little “+” above the part in the bangs, about even with the top line of the circle.  Then, just a tad bit above that, I draw a few jagged lines sticking up.  That’s because my hair is all over the place.  From there, I draw curved, jagged lines going down in the shape of the head.  This should be just outside the circle you drew.  If your hair is smooth, draw a single, curved line going down from either side of the part.  

Step 7: Darken the lines for the neck and shoulders.  Add a little flattened “u” for the dip between your collar bones, and a line close to either side of your neck.  That’s the little dip in your throat. 

If you want to add a little extra to your drawing to make it more you, here are some accessories to consider:

Step 8: Finally!  The pen!
Trace the final lines.  I usually do the hair first, because it’s the top layer.  After that, I do the facial features, and then lastly the outline of the cheeks and chin, the neck, and the shoulders (plus the details). 

Step 9: When your pen lines are dry, erase the sketched pencil lines that you no longer need!!!


Step 10: And now, the colored pencils!
Color a flat, base tone first.  I used light brown for the hair, peach for the skin, and pink for the lips.  If you’re blonde, I suggest a yellow base for the hair, but don’t make it too bright yet.  If you have darker skins, choose a shade of tan or brown that suits you.  

Tip: When I color in the eyes, I leave the little shine circle white.  The pupils I usually color in with pen.  For the iris, I use a dark shade and a light shade (in my case, of brown.)  Use the dark shade for the top half of the iris, and the light shade for the bottom half.

Step 11: This is the final part!  The shading!  For shading the skin, use either light blue, light purple, or a darker shade of your skin tone.  I chose light blue for this.  I shaded lightly around the eyes and down the (imaginary) lines for the sides of the nose.  I also shaded just below the bangs, and a little down the left side of the face.  I shaded a thicker line in the shape of the chin right below the chin, and down the right side of the neck.  I followed the line in pen, and I also shaded in the little hollow by the collar bones.  The last part I shaded for the skin is the dip of the shoulders.  

Tip: If you’re careful and don’t make it too obvious, you can use a black colored pencil around the eyes to make them look deeper.

I used an orange-red to lightly shade across the cheeks and nose.  This is because I blush 90% of my life.  It also adds a bit of rosiness to the drawing.

To shade the hair, use a darker color than you colored it.  I used dark brown.  If you drew a blonde, use a tan, light brown, or light orange to shade!  I colored in some jagged lines coming out from the “+” part.  I also colored in below the bangs, by the neck.  To add a bit of fun to the hair, draw in some darker streaks, and some lighter ones too, if you want!

The upper lip is usually a tad bit darker than the bottom lip.  I used a red and very faintly lined the upper lip.
 

Now, you should have a completed drawing!  Enjoy your cartoonized self!!! =D

Thursday, January 27, 2011

How To Keep Your Cats From Killing You...

"The quickest way to a man's heart is through his stomach."

It's Shelby, again! And clearly, whoever said this originally, has never had a cat whose food bowl was empty. They can be quite evil, us cat-owners know. But, don't worry! Tiger-Lily and Alice's bowls are both very full! Today, I decided to try something very new... Making my (well, their) own kitty treats! My Mom and Step-Dad bought me some "make your own cats treats" for Christmas! And here they are!!:


Adorable, huh? I love that fishy cookie cutter!!


The simplest directions EVER! Add water!

Pretty easy dough, too! Although, this is when the cat-treat smell become a little overbearing!


Go ahead and roll out the dough, you DO want your kitties to eat their treats in the shape of fish, right? Oh, you don't think cats care about what shape their food is in? Yeah, me neither.


Cut out the shapes, and put onto parchment paper...


Put cookie sheet into 450 degree oven for approximately 12 minutes (I couldn't get to the oven right when the timer came out because I was talking to my (super awesome!) future Mother-In-Law on the phone so it may have been in there for a little longer!)

Here they are! All baked and what-not. Although, they seem kind of large for kitties (more like the size of a dog-treat) so I decided to make some smaller ones...


In the shape of hearts!! <3 These are much smaller, and more cat-like.


Go ahead, throw them in a cute treat container and let the kitties enjoy! (I would not recommend people tasting them... Although, I may see if my Fiance would be up for it! Hahaha)


Tiger-Lily's taste test...

Alice's taste test...


These were super easy to make! At first, both cats just starred at the treats (probably because of the strange human standing in front of them with a funny device that flashes!), but TL got right at it and loved it! Alice batted hers around for quite sometime, but finally ate it! Looks like they love them! Oh... And here are some pictures of the wonderful kitties:

Tiger-Lily

Alice... Cuddling with the Mad Hatter, of course!


Tuesday, January 25, 2011

Clothes Line Pictures!

It’s Bonnie again!  And I have a new project ^.^

So I know last time I did that quilted owl pillow.  Let’s face it, even if it’s not “complicated” it’s time consuming.  This time, I’m posting something way less time consuming!  Yay!
This is something I first saw with my wonderful roomie, Amie:


Adorable, sí?
And because it is just oh-so-very-adorable, I’m going to show you how to do it!

You will need:
Hemp (or if you prefer, yarn, twine, string, etc.)
Clothes Pins (I bought a pack of 36 at the dollar store.  For $1.)
Acrylic Paint (I understand most people don’t have this just laying around like me, but it’s reasonably cheap at art stores, and you only  need as many colors as you want.  I used six for the –newly changed- colors of the rainbow.)
Paint brush
Black permanent marker (I used fine, but the regular size will probably be better, or thick if you want to do different patterns.)
Photos
Two push pins

Step 1: Figure out how many pictures you want to put up.  This will determine how many clothes pins you need.  I used eighteen, and my “clothes line” is somewhere between 3 and 4 feet long.  (I do have pictures on top and bottom, though, because I like taking up space.)
Take out the number of clothes pins you need.  Now you have another decision to make.  I did NOT paint all of my clothes pins because I like the mixed look with natural wood color and bright rainbow colors.  If you would like to keep some of them plain, remember to put them aside!

Step 2: Lay out two sheets of newspaper so you don’t get paint everywhere.  (You’ll want to be doing this on a flat surface, by the way!) Separate your clothes pins into piles for the colors you want.  Choose your first victim, pour the paint, and paint the clothes pin!


Tip: You don’t need to paint the whole clothes pin.  If you know which side you want against the wall and don’t want to risk the paint rubbing off, then don’t paint that side.  I painted the front, the sides, and the part that closes on whatever it’s clipped to.

Lay the clothes pins on the second sheet of newspaper to dry.  Once you’re done painting them, leave them there to dry!  Acrylic paint dries pretty quickly, especially if you don’t pile the paint on.  I usually wait about thirty minutes for it to dry.  In the meantime, you have something to do!

Step 3: When you know where you want it, put the two pins in the wall where you’ll tie the line.  I used hemp for my line, so just know when I say “hemp” I’m referring to whatever it is you’re using for your line.  So here’s how I did it!  I tied a slip knot (if you don’t know how to do this, look it up online!  It’s pretty simple =]) Loop it over one push pin and tighten.  Loop the string to the other push pin.  Here’s another decision you get to make: I looped mine several times so I had four or five layers of string.  You don’t have to do that.  Stop whenever you have the look you want, cut the string, and make another slip knot for the push pin you end on!

Tip: You don’t have to make it look like a traditional clothes line, and you can do more than one line!  Amie has two, one right under another.  (I really love the way it looks.)  Mine’s a little different because I’ve already covered so much space on my wall.  I did mine diagonally.  I also know others who do them vertically.  Have fun with this!  Do it whichever way makes you happy =]


Step 4: Go back to the clothes pins.  Hopefully they’re dry! (If not, wait until they are to do this step.)  Take your permanent marker and decorate!  I kept mine pretty simple.  Using a fine-tipped marker I wrote words going down the length of the pins (Imagine, Laughter, Family, Friends, Smile, Enjoy, Life, Dream, Forever, Fun, Explore, and Happiness).  You can do something like that, or the name of the people in the photos, or little polka dots, or stripes, or music notes, or swirly patterns, or just about anything!  You can even leave them plain if you want!


Step 5: Organize the photos how you want them and pin them to the string!  And, like magic, you have an epic wall decoration that’s fun for you and others to look at!


Sunday, January 23, 2011

Chicken & Rice

Hey-ayy! Shelby, here! Do you have a go-to recipe? The recipe that you might have barely anything in fridge and pantry, but you can still make an absolutely delicious meal? Well, I do! And now you do, too!


This. Chicken and rice is the ultimate comfort food for me, my family, and my fiance! It is probably the simplest real meal I can make! (I say "real meal" because macaroni and cheese and hot dogs cannot feed college kids for very long) My Mom taught me how to make this when I was 14, and I've been loving this ever since! Oh! And just to show you how totally amazing my mother is, she made this recipe up! How ridiculous is that?! I am so appreciative of having a great Mom that makes up her own recipes! It is so easy, only a few ingredients, and it tastes so GREAT!


First, get three cans of "Cream of ____" soup. I generally prefer to have two Cream of Chickens, and one Cream of Broccoli, but this time I improvised with celery (it's what my Mom normally uses). Throw them into a big pot! And add one can of water, and one stick of butter. It's gonna look gross, but trust me, it's so worth it!


Add 2 cups of Minute rice and bring to a boil. Put raw chicken breasts and part of the rice mix into a casserole dish.


Now put the rest of the rice mix on top of the chicken....


Bake at 350 degrees for about an hour (depending on your oven).


And: enjoy! Holy YUM!


Hope I did well on my first tutorial... Oh! And everyone already knows that I am getting married (obviously, to the most wonderful man in the entire world!) and Bonnie is my Maid of Honor! I asked her (well, proposed to her, technically!) yesterday at the Farmer's Market. I absolutely loved the bread she bought (we made squirrel pot pie and cut up the rosemary bread she got! YUM!) and I got some AWESOME Raspberry Honey, Kettle Corn and Cotton Candy! Yesterday was a wonderful day!

Friday, January 21, 2011

Quilted Owl Pillow

So young grasshopper…you wish to learn something.  Something like what?  Quilting an owl, perhaps?  I’m not sure if you’re ready for that.  But that’s okay, I’ll teach you anyways. 

What you’ll need:
Pins
Strips of cloth (Personally, I chose strips.  If you prefers squares or scraps, that's fine too.  I think triangles, especially, would be adorable.)
Thread (I used a bunch of different colored thread out of one of those $1 sewing kits…why not, right?  It’s quilting, everything’s a different color anyways.)
Two buttons (For the eyes…so doing tree-buttons might be kinda weird.)
A remnant of whatever size you want your owl to be (Remnant: you can get it at most fabric shops pretty cheap.  It’s the cloth they have left that’s too small to sell by the yard.)
Needle <---pretty important
Stuffing (or fluffing, if you prefer!)
And this pattern here:

About this pattern: it’s a shaky sketch.  Obviously, it was done on the computer.  When I made my first one I used a large sketch pad (18X24) and cut everything out separately.  They’re all pretty basic shapes.   

The wings look a lot like scalene triangles with the long end rounded. 
The body itself is oval-esque with a stubby top and two triangular ears. 
The eyes are circles, and I used an extra circle cut in half to do the feet. 
The belly is simply an oval. 
The last bit, the beak, I did as sort of a caving diamond – if you want to simplify it, a triangle will work just as well! 

Tip: with the ears, eyes, feet, and wings, only cut out one shape as the pattern!  That way, they all come out symmetrical.  

Now we get to the fun part! (Actually my least favorite part).  You get to pin the fabric to the pattern!  I would personally start with the main body.  Make sure you overlap the fabric enough to sew the scraps/squares/strips together.  Then, once the fabric is pinned, you trim it to the proper shape.

Tip: I did the wings with vertical strips as opposed to horizontal.  It gave it a more homey look!  Also, I avoided using yellow for anything but the eyes, feet, and beak.

Once the fabric is trimmed, you can unpin it.  I unpinned mine one strip at a time to keep it in order!  This is where the sewing starts.  Putting your first two scraps of cloth together FACE TO FACE (That means bright side to bright side, front to front!) Start stitching along the first border.  (I poked a hole and then looped the thread over the seam and then poked a hole in the same side as the first hole.  Make sense?)  And now, dear friends, you have the beginning of your owl!  Follow the same procedure all the way up (or down if you started on the top!) the rest of the body.

Next, you do the same thing to the wings!  And, trying to make it as even as possible, you stitch them to the sides of the owl (keeping it Face-to-Face so the seam isn’t all shredded and gross looking).  I did mine about a third of the way down from the top.

From here on it’s pretty easy.  The ears are probably only one piece of cloth each, so they can get stitched on without the hassle of being quilted first!  

The belly on my owl was two pieces of cloth.  The reason I did this was so it would have a thin border: it’s just two ovals, one slightly smaller than the other.  The smaller one get’s stitched on top.

The eyes should be looking in the same direction, unless you purposely make your owl face two different directions.  When you sew the buttons to the circles, think about your positioning!  (I make an ‘x’ when I sew buttons – I stitch through diagonal circles a few times, and then stitch in the other diagonal a few times before tying it off.)

The beak and the feet don’t need any preparation after they’re trimmed.  

From here, you just pin the pieces to the owl and sew them onto the front! It should look something like this:
And now, the easiest bit!  Tape the pattern wings and ears to the pattern body and pin your remnant to it.  Cut in the shape of the owl.  FACE TO FACE sew the remnant to the quilted front of your pillow.  Make sure you leave enough of a gap to flip the owl right side out.  When the owl is flipped right side out, stuff it full of the fluffing.  Now, pinch the gap together and quickly finish sewing it.  Voila!  You’re very own Quilted Owl Pillow! =D

(This was the first one I made.  Please don't hate on it's lumpy form!  I wasn't well-versed in the art of sewing fabric neatly at the time, haha!)

Enjoy your pillow!

Wednesday, January 19, 2011

Meet: Shelby!

Hi There! I'm Shelby. I am a pretty fantastic person. I grew up in Michigan, not exactly on a farm, but we had chickens, and lots of land! I moved to Florida a little over five years ago, and have been loving the heat ever since! I love baking, and more recently have grown to love both knitting and sewing, thanks to a good friend you all have already met: Bonnie! I have a wonderful Fiance, and a pretty awesome family. I have three older brothers and two sister-in-laws (hopefully I'll have a third one, soon)! I'm pretty much obsessed with bows, and I'm spending a lot of time planning the biggest day of my life, my wedding! I'm off on my own, so frugal living is so important to me, and I have two kitties to take care of! Tiger-Lily and Alice are their names! Anyone notice the Disney movie + novel theme? My Fiance and I did not plan that! And as weird as it might be, I love video games! I love playing Halo with my Fiance and his buddies, and I love playing Fable and almost everything in between. I'm not really a nerd, like Bonnie, I'm more a geek!

And I'm so sorry, Bonnie, but Tiger-Lily is the best kitty in the world, not Keca! And definitely not Alice!

Anyways, it was nice meeting you, I hope we can become friends! :)

Meet: Bonnie!

Hola! Me llamo Bonnie!  And no, I don't actually speak Spanish...not well, anyways.  I love crafting!  I have a habit of taking on projects that are a little more difficult than I anticipate, but I always have fun with whatever it is I'm doing.  Most recently, I've learned how to crochet (I started with the Afghan Stitch...then someone sat me down and explained to me that I should probably start with the Double Crochet Stitch since that's more common.  So much for flipping to a random page and starting there, right?)  My favorite crafts tend to involve my artwork - I love trying new styles of drawing and painting, especially if the two are mixed together.  Unfortunately, I'm a full-time college student, and when I have a semester break I work all day, every day in an office.  I love my classes, and I love my work, but I miss having time to craft.  This blog has some of my favorite crafts, and it reminds me of why I love trying new things so much.  I hope you enjoy our tutorials!