Sunday, February 13, 2011

A Head Full of Fluff

(This five-hour project brought to you by Bonnie <3 ....but just kidding, it didn't take a WHOLE five hours.)
A Head Full of Fluff

You Will Need:
A ball of yarn (Double-twine or fluffy yarn, for best result)
A round loom (Less than $15 for a set at most art stores, in the knitting section)
A little knitting hook (Usually found in loom set)
Scissors
Ruler (I didn’t use one…but feel free to!)


Step 1: Tie a slip knot at the end of the yarn!  If you do knot (pun intended) know how to do this, check out this link:  http://www.wikihow.com/Make-a-Slip-Knot  (If you have a lot of trouble with the step, just loop it tightly over the peg.  The slip knot is just there to make sure the yarn stays in place.)

Step 2: Tighten the slip knot onto the knob sticking off to the side!

Step 3: Cast yarn onto all the pegs.  This part seems complicated, but it’s not!  Bring the yarn up from the sideways knob, slip it through the first two pegs.  Going to the right, bring it around the peg, all the way.  You should be back behind the peg.  Carry it on to the next peg, and repeat the same step.  Continue.  


Step 4: Press the completed loops down to the bottom of the pegs.  Repeat step 3.  You should have two separate lines of loops on each peg, now.


Step 5: Pick up the hook, now!  Slip it under the bottom loop of the first peg.  Carefully use it to lift this bottom hoop OVER the top one.  Complete this for all pegs.  Now repeat step 4 (including the “Repeat step 3”).


This is going to continue for a while.  

Tip: Sometimes, to avoid the yarn unlooping itself during the beginning of Step 5, I go clockwise instead of counterclockwise when I use the hook to carry the bottom loop over.  If you have trouble with the yarn unlooping itself a little, try doing it this way!

Step 6: Periodically measure the length of your hat.  Suggested length is 7-8 inches.  I usually carry on a little further, because I want the hat to fully cover my ears.  

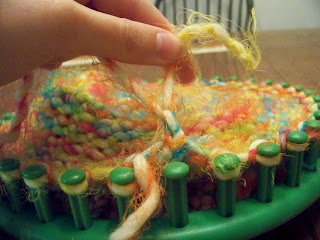
Your hat is going to look like this while on the loom:
This is the inside of the hat! (Or it will be, eventually.)

This will be the outside! (Eventually =P)


Step 7: Once the hat is at a desirable length, cut the yarn about four or five inches from the hat. 
With the yarn left in the original pile/roll of yarn, cut off a length of about twelve inches.   
If you want to make this part a little longer, that’s fine.  


Step 8: Use the hook to scoop the first loop of yarn on the loom.  Lift it over the peg.  Using the loose strand
of cut yarn, slip it through the loop.  Continue on to the next peg.  Make sure the loose strand of yarn doesn’t
leave any of the loops!  You want both ends of the yarn to meet when you get to the end of the circle.

 
Step 9: Your hat should be off the loom now.  There should be three loose strands of yarn on top.  Take
these, and pull them to the INSIDE of the hat.  Tighten them until the top of the hat is fully closed, and then 
knot them all together until you’re confident that your hat will stay in one piece.  Cut the excess off.


Step 10: The bit of yarn at the hem with the slip knot should still be there.  Loop it around a stitch in the hat 
and it off.  Cut the excess yarn.  


Voila!  You have your very own hat!!!

Friday, February 11, 2011

Who's Up For Some Shots?!

Sorry, kids... Not real shots! These are super sweet treats that are so easy to make, taste great, and look wonderful! I surprised my Fiance with these and he loved them!


Grab some shot glasses! The Fiance had gotten these as a gift from me awhile ago from Target and I decided to put them to some yummy use! I liked using the long ones, and paired them up with longer spoons, but if you only have short ones, that's okay, too! I had some left-over cake mix from the Rainbow Cupcakes I had made the other day, so I baked it into a cake!


I decided to base the cake white and place different colors within it! There's no real method to this, just plop and swirl!


It came out a little over done... (Darn my apartment-quality oven!) But I know the inside looked fantastic! So this is the tricky part... Grab a shot glass, and cut out a piece of cake with it!


Sorry the picture is a little blurry! But go ahead and shimmy that cake down into the bottom of the shot glass and then pipe (it was the easiest way to do it for me) some icing on top of it! Then repeat with cake, icing, cake, icing! Oh man! So yummy!!


Grab a long spoon and have at it! I froze some of mine for a sweet cold treat! Holy Yum!!

<3 S

(B adding on: also try cake and ice cream if you're like me and dislike icing!  Only if you're putting it in the freezer, of course ;) Or, if you want to pretend it's somewhat healthy, add some slices of fresh strawberry between the layers =])

Monday, February 7, 2011

Rainbows & Unicorns!


Pretty, huh? Shelby's back, and I'll be covering rainbows & unicorns!! Not exactly real rainbows, but it's still gorgeous! And actually, I won't even talk about unicorns... That's possibly for another day! I've seen these rainbow cupcakes (and cake, and cake balls, and pretty much anything you can color with food dye!) floating around the internet, and I've been making them for a little over a year now. I recently got a new cupcake pan from Ikea from my Future Mother-In-Law, so I knew that this would be the perfect moment to use it! You don't need many ingredients...


Go ahead and prepare the cake mix according to the directions on the box (I usually don't make cake from scratch for things like this... Take out a few steps and save some time!) and then seperate the cake mix into different bowls...


I'm not sure of the exact measurements that's in each bowl, but does it really matter? Plus, if you have a favorite color, you can have more of that color than any other!! Grab your food coloring (I usually use my Wilton dye, but I ran out of red, so I used some of the cheap-y stuff I got at Wal-Mart a long time ago!) and dye the mix in each bowl a different color!


Beautiful, aren't they? I usually like my colors deeper, but honestly, who wants to eat a ridiculously colored cupcake? Oh... Wait. That's exactly what we're doing, huh? Oh, well!


This step is super important, especially if you have a lot of colors! Line them up in the correct order. I'm totally serious here... Remember grade school? "ROY G. BIV". And if I see that you have strayed from said "ROY G. BIV", you will have a serious talking to. Oh, you don't kow what "ROY G. BIV" means?? It stands for: Red Orange Yellow Green Blue Indigo Violet! The colors of the Rainbow, of course! Now you can't say I never taught you nothin'! Of course, I don't have every single color, but that's okay! So, go ahead and put your cupcake liners into your pan...


And start filling them! Only put a little bit of each color in the cups, though, remember, we want them to be rainbow! So, first is red (really pink, hahaha).


Next up is: Yellow!


Then: Green!


Then... Blue!


And, finally: Indigo (blue-ish purple-ish)! And bake according to your cake box's directions! Mine took a little less time because of the funky shape!


I love this picture! They look like little-baked-Earths! Hahahaha, LET THEM COOL! Seriously, have some patience. Or eat them warm. Whatever!


Cute, huh? I love the cupcake liners, too! And my plates are adorable... Gotta love HomeGoods!


I love the shape of these! And look at the colors on the sides! AMAZING!!! And, begin to frost! Do it however you wish, but I like to use white frosting. Makes it look like clouds!


All frosted and what-not! Which frosting style do you like best?


Zig-Zag?


Or maybe the puffy-clouds?


How about the traditional cupcake swirl?


Throw some dolphin (queue "So Long And Thanks For All The Fish") sprinkles on there and you've got yourself a gorgeous little treat! Enjoy, everybody!

Saturday, February 5, 2011

Drinking From a Fish Bowl!


So I tried something new the other night – I painted glasses!  As in the drink-from glasses, not the balance-on-your-nose-and-ears glasses.  It was reasonably cheap, and they came out super awesome!  I’ll probably just use them as decoration, but they’re dishwasher safe ;)

What You’ll Need:
A glass item of some sort (I chose a martini glass and a wine glass because of the stems.  I also bought both at the dollar store.)
Glass paint (You can find this at art stores, usually in the same aisle as the bottled acrylic paint.)
Paint brushes
Wire (I used 20 gauge.  The lower the number, the thicker the wire.  The thinner wires break easily, so keep that in mind!)
Beads (Whatever colors you want, make sure they fit on the wire)


(The plant is not necessary.  It adds to the picture though, don't you think?)


Okay, so first things first.  Wash the glass items!  I know most people will snort and refuse this step, but honestly it will make the paint go on nicer.  And you won’t be trapping nasty dust particles between the paint and glass.
 
Are your glass items washed?

If so, then on to this step: begin painting! =D  I know, it’s easier said than done.  But here are a few tips: Don’t paint too close to the rim of the glass.  You want to be able to sip from the glass without drinking paint.  Also, don’t paint on the inside of the glass.  I hope that one was kind of obvious.  If you don’t know what to paint, here are a few ideas!

  • ·         A fish! (I did this one!)
  •  The fish in three steps - yellow oval, orange fins, and then two red dots as lips and one black dot for an eye!  Wavy green lines = seaweed.  Blue dots, thicker at bottom, more sparse at top = water!


  • ·         Flowers
  • ·         Peace signs (I also did this one!)

  • ·         Words (I wrote: Happiness, Peace, and Love on the Peace sign glass!)
  • ·         Colorful dots (or hearts- I separated the words with tiny blue hearts for the peace sign glass =P)
  • ·         Designs
  • ·         Leaves
  • ·         Shoes
  • ·         Paw prints
  • ·         Etc.
I painted using dots, mostly because it gave me an excuse not to be too detailed. 

THIS STEP IS IMPORTANT
You have to WAIT.  I don’t mean you have to wait for it to dry, I’m saying wait about 2 days, unless your glass paint has different directions on it.  When the allotted amount of waiting time is up, there are more directions.  However, there is something you can do in the mean time!

Cut off about a foot, maybe a foot and a half if you want it to cover most of the stem, of wire.  Twist one end into a small, temporary loop, so the beads don’t fall off.  Begin dropping on the beads.  I used mostly smaller beads, with a bigger one dropped in every now and then, just to add to it.  Twist another loop at the opposite end of the wire, once you’re done beading it.  Put these strands of beads aside.  They will go on the glasses later. (Note: These bead strands can really only be used for the glass items with stems!  Thus, the reason I used a martini glass and a wine glass.  If you used, say, a bowl or plate the beads will not work!)
(For the fish, thus the little shell beads.  I don't suggest them.  They don't lay quite right on the foot of the glass :( )

When your glass items are ready for the oven, put them in.  This means DO NOT preheat your oven.  That would be a bad thing.  Just put your glasses in, turn the oven up to 325, and set the timer for ten minutes.  When the buzzer goes off, take your glasses out and wait for them to cool down.  The paint is now dishwasher safe.  

Unloop one of the wire-loops, and reloop it around the bottom of the stem.  Start twisting the beaded wire up the stem, around and around.  At the top, unloop the temporary loop, and reloop it around the top of the stem.  Voila!  Cute little glasses :)

Thursday, February 3, 2011

Jell-O Mocktails & Cocktails!

Hi ya'll! Shelby, here! I have a stupidly simple tutorial for everyone under 21, and my Fiance will be guest posting (kinda) with the same tutorial for everyone over 21! Really easy recipes with a dash of awesomeness!


This is all you need! Well, honestly, all you need is the Jell-O mix and water, but to make it all fancy and awesome, you can add cool containers! (For us it was the martini glass and shot glasses!) Go ahead and prepare the Jell-O according to the directions on the box, but instead of pouring into single bowls, pour into martini glasses or another speciality glass. It's an instant upgrade to any simple Jell-o!


Yummm! Go ahead and add a bit of whipped cream and you've got yourself a wonderful little dessert!


And... As many of you know, I do not drink alcohol, but the Fiance does! So, I've asked him to put a spin on the Jell-O mocktails I've shown you and add some "happy juice"! Hahahah... Well, here he is!

The Fiance... Totally Awesome

Hey! It's the Fiance. If you want to make these "Jell-O Mocktails" into "Jell-O Cocktails" all you have to do is prepare the Jell-O according to the directions on the box, and let it chill, so it's not scalding hot (you don't want the alcohol to burn out!) but also, not hard. Pour approximately 8 ounces (roughly 8 shots... Or even more if you wanna have a lot of fun!) of your favorite "happy juice", I prefer vodka for Jell-O shots, but there are a lot of recipes online for different combinations. I don't buy the top-self liquor for these, the generic brands work perfectly. Stir Jell-O and pour into desired containers (I love the tall shot glasses) and let it set! Enjoy responsibly, and only if you're over 21!

Tuesday, February 1, 2011

Turn Your Toe-Nails Into Fruit!

Okay, you caught  me, I don’t mean it literally.  But hey, if you want a cute, summery idea to get you out of this funk that is winter, check this out!


I painted my toenails…to look like watermelon.  Here’s how I did it!

You will need:
Hot Pink (or Red) nail polish
Green nail polish
And either Black nail polish and a toothpick (seriously) OR a Black nail polish art pen!
Also, if you’re really picky (I’m not) you can consider a white nail polish pen too.
Either a shimmery or clear top coat nail polish

Step 1:
Make your toe (or finger, if that’s what you would rather do) nails all nice and purty-shaped after removing any chipped and month-old nail polish that may or may not be there!  If nail polish remover was used, make sure you wash your feet before continuing to the next steps =]

Step 2:
Paint roughly two thirds of your nails, starting at the base, Hot Pink/Red (this should come up to the whiter part of your nails).  Chill out for a while to let them dry.  If you need a second coat, to make the color stronger, have at it.  

Step 3:
Paint the strip of nail left blank with the Green nail polish.  If you want it to look really realistic (which is humorous, considering it’s on your feet) you can leave a small white strip between the Hot Pink/Red and Green, or you can paint it in.  I elected not to do this.  

Step 4:
After the Hot Pink/Red, Green, and possibly White have dried, you get to do the fun part!  When I first did this, I did not have a nifty nail polish pen.  I had Black nail polish, which I made useful due to the toothpick I managed to dig up.  Dip one end of the toothpick into the nail polish.  BE CAREFUL ! THE TOOTHPICK CAN CHIP THE COLORS ALREADY ON YOUR TOES!  Draw little vertical slash marks, raindrop-shaped, if you’re truly skilled, over the Hot Pink/Red section of your toes.  Now, I have an art pen.  You can just draw it normally with these.

Step 5:
When the Black is all the way dry, finish with the top coat!  I had a shimmery yellow color that came out just shimmery over these colors.  It gave the watermelons a nice, glimmering and glittering shine.  If you use a clear coat, the colors will be extraordinarily bright.  Once this top coat is done drying, go and impress your friends with your blatant disregard of the season =]


Happy Watermelon-ing =]
-Bonnie