Thursday, March 3, 2011

Grandmother Willow! (Pine)


I’m sure it’s not very often that you sit there and think “Wow, I could really paint a slab of wood right now.  I mean, really, if I only had carving tools, wood, and paint…  Unfortunately, that is EXACTLY how I think; therefore, I went out and bought exactly what I needed.  While I do generally encourage people to try new things, this project will probably cost about $30, so think about it first.  If you don’t want to carve out what you’re painting first, then it’ll probably only cost half of that.

What I Used:
Beginner’s carving tools (because really the last thing I need is hard-to-use-and-sharp objects)
Slab of wood (I like the one I bought because it still had a bark frame.  Using one of the pre-cute and sanded pieces of wood will knock the cost down even more, though.)
Paint (I ended up using only yellow and brown)
Paint Brushes
Pencil
Paper

Step 1:
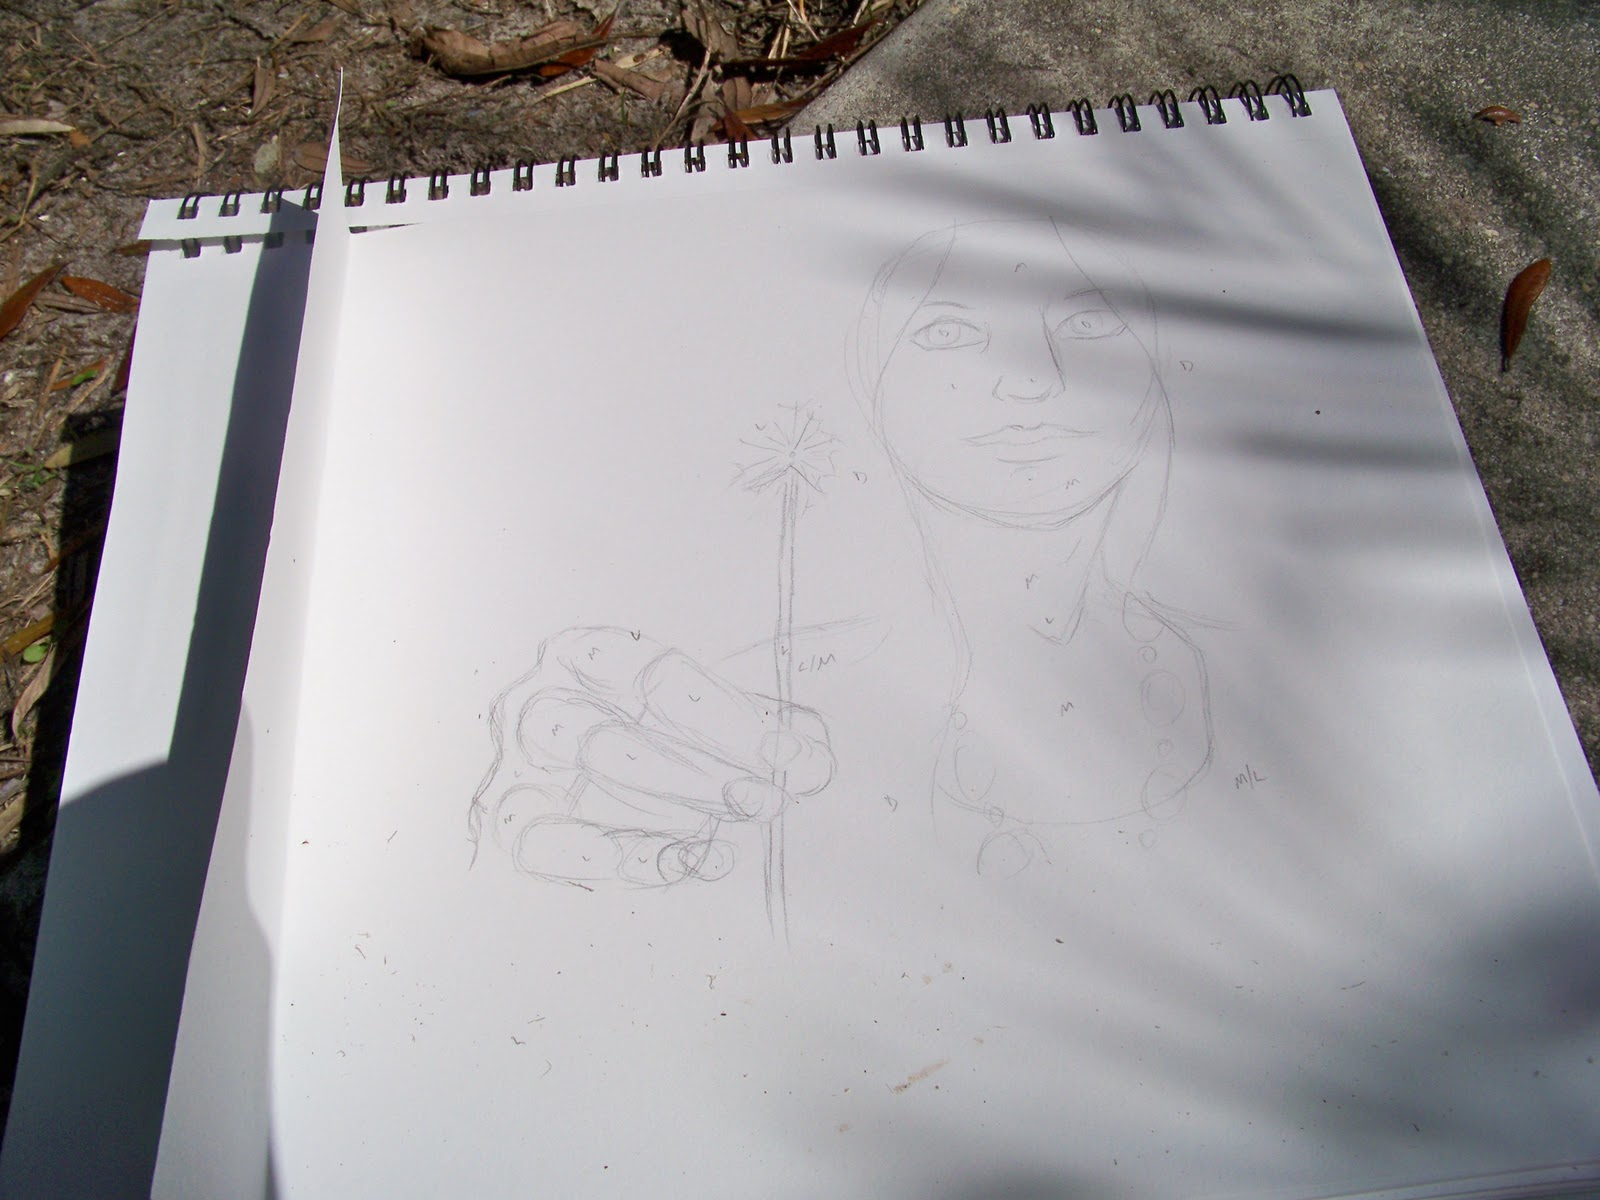
Sketch out, on the paper, basically what you think you want to paint.  This is important, because pencil doesn’t erase easily off wood.

Step 2:
Now, pressing lightly with the pencil, sketch your drawing onto the wood.


Step 3:
Using the thin, diagonal-straight blade from the carving kit, trace your lines into the wood.  Don’t just cute the very edge, you should be leaving a line that won’t wear down into the wood quickly.  Always cut AWAY from you, too.  My art teacher and I used to head-butt about that because I carved better if I went towards my hand.  That ended after I bled all over my work THREE different times.  (I’m a slow learner.  Learn from my mistakes though: DO NOT CARVE TOWARDS YOUR OWN FLESH!)

Tip: Use multiple lines for hair or leaves, or anything like that.  It’ll had a little more detail, but it’ll still keep a sort of “abstract” look.


Step 4:
Hold the wood flat in front of your face, and blow the shavings off.  There probably won’t be too many, but you don’t want them getting caught under the paint.  Avoid doing this in the direction of someone's face.  It's painful.

Step 5:
Using the paint, begin shading.  For the regular shading I used a yellow-brown mix.  I would paint a line or blot and then drag my finger throw it to smear it.  I also did this using a dry brush, which gives it a spotted, jerked look.  I used regular brown for the darkest areas, and yellow to accent small parts.  I painted the dark brown along the outer edge and smeared it in, too, so the shaded part would really stand out.  The thing is, I didn’t cover the entire wood with paint.  See if you can leave some of the natural color peaking out!  It can be the lightest area, or if you would rather not paint the outside part, it can be the background!


Detail: I haven’t done this yet, because I’m not home and I don’t have all my paint.  What you probably can’t tell right now is that the girl in mine is holding a dandelion.  Once I have my white paint, I’m going to trace the fluffy part with it to make it really stand out.  I’ll update this blog when I have the final product!

Enjoy your wood project :P
-Bonnie

Sunday, February 27, 2011

Tropical(ish) Smoothie


This is Bonnie!  I’m so sorry I didn’t post two days ago, but my sister was in town visiting and I spent a lot of time with her because we hardly ever get to see each other <3  But here is a post, two days late, so I hope you enjoy it.


So here’s the thing – I love smoothies.  They’re my comfort food, they’re my happy food…I mean, I basically make smoothies for everything.  Bad day? Smoothie.  Got accepted into college?  Smoothie.  Nothing exciting happened?  Smoothie.  I love my smoothies.  This is the “recipe” for my favorite smoothie! (It makes about two smoothies.)

What you will need:
Honey
Whipped cream (technically this is optional.  Not for me, though!)
8 Strawberries
1 Banana
3 slices of Pineapple
Ice
Orange Juice
Cups
Bendy-Straws
Blender
Knife

Step 1
Fill one of the cups up with ice and drop it into the blender.  Cut the banana, sans the peel, into three or four pieces.  Drop it in.  Cut the nasty, spiky part of the pineapple off, and drop the fleshy part in.  (I use the pre-sliced Publix pineapple because it’s convenient and not too expensive at all…I never spend more than two dollars on them.)  For the strawberries, I used eight or nine.  If you’re using tiny strawberries, use more, if you’re using bigger strawberries, seven or eight is probably enough.  I heard once that most of the nutrients from the strawberries are in the leafy part, so I tried putting them in a smoothie one time.  Don’t do it.  It tastes bitter and nasty.  Just use the fleshy part of the strawberries, slice it up a bit, and drop it in.  Pour in some orange juice.  I usually cover at least two thirds of the area the ice takes up, but don’t put in too much because the taste will be overpowering.  


Step 2
Blend.  (Haha, sorry, that was an obnoxious direction to put in.  But seriously, you have to blend them all together.) 

Tip: If you find that it’s not blending well, TURN OFF the blender and use the knife to mix it around a little.  A lot of times it’s just a question of too much ice in one place.  If, after that, you’re still having trouble, try adding a little more juice.

Step 3
Pour smoothie into two glasses.


Step 4
Drizzle honey over top.  This is honestly one of my favorite parts of the smoothie.  I love honey.  I use a sourwood honey I got at a farmers market, but any ol’ honey will do!


Step 5
Pile some whipped cream on! (Yum.)


Step 6
Stick in the bendy-straw (and bend it), and voila!


Enjoy your smoothie!  (I finished mine before I was even done writing all this, haha.  It was delicious.  It’s a very tropical tasting smoothie.  If you want a pit more “tropical” flavoring to it, use a little bit of coconut milk with the juice!

Monday, February 21, 2011

Made of Rainbows


Today’s blog was a lot of fun, but it might be a little challenging if you don’t draw frequently, so be prepared.  If it helps, try sketching it a few times on computer paper!

Here’s what you need:
Watercolor
Paintbrushes
A cup of water
Pencil
Charcoal
Charcoal paper OR Watercolor paper (I suggest WC paper.)
Toilet paper

Step 1:
Sketch the outline of your drawing in pencil, lightly.  I mean really lightly!


Step 2:
Starting with the red watercolor, near the top of the paper, paint a few streaks.  (The lips of the girl I drew were at the top, so I started there!  Use the toilet paper, and drag it down where you painted.  You should now have some semi-faded streaks. 


Move on to orange, and blend it a little where the red was painted, but make the bulk of it a little below the red.  Using the same tactic, streak the orange with the toilet paper.

Now do the same thing with the yellow…and then the green…and then the blue…and then indigo, if you
have it…and then violet!

Step 3:
Now, starting at the top again, splatter some red against the paper!  I do this from about a foot away.
 Don’t do this step against anything important and white, because it will get destroyed!  Follow the same
step for all the other colors.


Step 4:
Wait for the paint to dry.  You might as well put away your paint stuff now, because you won’t need it
anymore.

Step 5:
Using a stick of thin charcoal, trace the outline of your drawing over the paint.  At this point it should be
looking pretty epic!


Step 6:
Using the charcoal again, shade in some basic areas.  Don’t shade in the whole drawing, because you
don’t want to overpower the colors!


And now, here is a Bonnie masterpiece:

Saturday, February 19, 2011

A Guide To Theme Parks: Part One

"Hi, my name's Shelby and I'm addicted to theme parks."
All Together Now: "Hi, Shelby."

I live in Florida. Loving theme parks is a (financially) deadly habit to have. Luckily, I have acquired tickets/passes/whatever to most of the theme parks, so I can enjoy them whenever I'm able to! In the last 5 years, I've been to: Disney's Animal Kingdom, Disney's Hollywood Studios, Disney's Magic Kingdom, Disney's EPCOT, Universal Studios, Islands of Adventure, SeaWorld, and Busch Gardens. I have actually worked at all three major corporations: The Walt Disney Company, Universal Orlando, and SeaWorld Parks & Entertainment. I know the ins and outs of theme parks, I know how to enjoy them. Wanna learn?

Cinderella's Castle at Disney's Magic Kingdom


Step One: Know The Difference

Theme parks are different from Amusement Parks (the Fiance and I had this conversation last night). Theme parks offer the whole experience, you step through that turnstile at Busch Gardens Tampa Bay and you are immediately immersed with African music, wildlife, plants, and even smells. You walk into an amusement park and you hear screams from the roller coasters and someone offers you popcorn. There's a huge difference. Take, for example, Disney's Magic Kingdom... They have separately themed lands within one park. These lands include: Main Street, U.S.A. (all the best shopping and dining), Adventureland (Pirates, anyone?!), Frontierland (from Tom Sawyer to Big Thunder Mountain Railroad), Liberty Square (The Haunted Mansion!! And The Hall of Presidents, honestly not that fun), Fantasyland (when you think Disney, you think of this area), and Tomorrowland (Space Mountain and more). Mickey's Toontown Fair has recently been closed down to begin an expansion of Fantasyland! You walk into one of those lands, and immediately the music changes. The Cast Members are wearing different 'costumes', speaking differently to you. You are immersed into an entirely different world. A world of total awesomeness.


Tree of Life at Disney's Animal Kingdom

Step Two: One Day Per Park

Do not roll your eyes at me! I'm so serious, here. Unless you have been to the park more than twice, limit yourself to one park per day. You will not enjoy the rides, shows, or attractions when you're racing from Space Mountain to Pirates of the Caribbean because you have to get to Animal Kingdom at 2, otherwise you won't be able to see the Lion King show and the park will close. Seriously, chill out for a moment and think about this. I know your vacation is limited... Most Americans only put aside 4-5 days for vacations. I would suggest doing one of each of the major parks. Do one Disney park, one Universal, and one SeaWorld. I know how difficult it is to only do one Disney park. I, myself, made the mistake of doing multiple parks in one day when I first began going. Me and my friend would race from bus to bus trying to get all of our favorite rides in one day. That's completely crazy and should be completely avoided at all costs.

Waterfall at SeaWorld Orlando


Step Three: Slow It Down

My favorite memories of theme parks are the days when me and my Fiance would go and just walk around. I understand that tourists and out-of-state guests cannot enjoy the parks like that because they are time-limited, but please, make sure you have a little bit of time each time to sit on a bench and just take it all in. If you race to be the first person on a certain ride, you're missing the entire experience of walking into the park. Tourists tend to overlook the landscaping at parks, I've noticed. I used to be guilty of that. I went to Universal today, actually, with Bonnie, and our awesome friend, Amie, and we were waiting in line to get Lemon Slushies (not kidding, the best thing that Universal/Islands of Adventure have to offer... Besides the Green Eggs & Ham Sandwich), and Bonnie and I talked about plants we saw in a pot nearby. It's not often you stop and notice little things like that, and they had these beautiful purple daisies and other wonderful mix plants inside. Theme parks do a lot of work on their landscaping for it to be just right, for YOU, the guest. Which leads me to my next point...


"Believe" show at SeaWorld Orlando

Step Four: It's All About You

You just spent $5,000 on your family of four to enjoy the Florida theme parks. You see that Cast Member over there ready to take your order? Yeah, you're giving them their paycheck. That Universal Team Member leading you to your seat on the Hulk? Yeah, you helped them pay their Cable bill. Without you, the guest, there is no theme park. None. You are the reason they have a show called "Pets A'hoy!", you are the reason for the "Believe" show. You. You. YOU. You have the control (within reason, c'mon). If a Team Member treats you badly, tell them, if they don't try to correct the service, immediately tell a supervisor. Disney is all about Guest Service, all the time. They have Magical Moments, and Guest Recoveries. They're doing it right. Now, Universal and SeaWorld have guest recoveries, too, it's not fair to leave them out. Today, at Universal (won't use any names, don't want anyone fired because of me), I bought a bracelet that I was having engraved. The bracelet was $13. I told the woman what I wanted engraved on it, and she engraved it on the side, not centered, and it looked horrible. I told her I didn't like it and that I wanted her to re-do it. She gave me a funny look and tried protesting. I had none of it. I grabbed another bracelet and had her center it. She did, but was angry about it. I wasn't going to pay $13 for something I wouldn't love. $13 I could have spent elsewhere. $13 could have bought me a cup at Disney. $13 could have bought me a stuffed Shamu at SeaWorld. And usually, team members know this, this lady did not. Theme parks will do almost anything to keep you with them. They want you on their property, spending your money on their food, their lodging, their parks. They don't want you to leave. You have them wrapped around your little finger. Milk it! Milk it for all it's worth!!
Cinderella's Castle at night


That's it... For now. Eventually, I'll get around to doing another post about specific parks, rides, shows, and attractions. But, I would love to know what you think of this one.

Thursday, February 17, 2011

I Don’t Share My Cheesecake


…which is why I make little individual ones; this way, no one has an excuse to try to eat mine!
So here’s how I do it, almost following my mom’s recipe! (I say almost, because I tweak.)


You Will Need:
1 Box of Vanilla Wafers
2 (8 ounce) packs of Cream Cheese
¾ Cup of Sugar
2 Eggs
1 Tsp. Vanilla Extract (random fact: I had to force myself to type “vanilla,” because I would honestly rather call it ‘nilla.  You’re welcome.)

That’s for the first part! This is for the second part:

1 ¼ Cup of Sour Cream
¼ Cup Confectioner’s Sugar (honestly, I used more.  But this is what the recipe says.)
1 (21 ounce) Can of Cherry Pie Filling (Or, if you’re cool like me, a jar of Maraschino Cherries)

Okay, so Step 1!

  •  Preheat oven to 350 degrees F. 
  • Use cupcake papers to line a cupcake pan.  (I used Cars cupcake liners...I got them because my sister loves Cars!  It’s her favorite movie.)
  • Using 1 vanilla wafer per cupcake, crush them into the paper and spread somewhat evenly on the bottom.  (My mom felt the need to specify that I should not use my teeth for this part because “it’s germy.”  So, there goes that plan.)

  • Mix the Cream Cheese, Sugar, Eggs, and Vanilla Extract!  Please do not try to mix this with a fork like I did, because it seriously feels like weight-lifting.  If you have an electric mixer, make use of it!
  • Spoon the batter over the crushed ‘nilla wafers.


  •   Bake for 15-20 minutes (I ended up baking mine for about 23 minutes, but I have an old, not-quite-all-there oven.)

  • Take them out and let them cool for an hour!
On to Step 2!

  • While the cheesecakes are cooling, blend Sour Cream and Confectioner’s Sugar until they’re smooth.  I used a fork for this.  I also kept taste-testing it and adding more sugar because I’m like that…don’t be afraid to add sugar to it.  The sour cream does have a strong flavor.
  • When the cheesecakes are cool, spread some of the glaze over them.

  •   Drop a cherry on it! (If you’re using the Pie Filling cherries, use two or three!  If you’re using Maraschino, hold back and only use one.  The flavor is a little different, don’t forget.)
  • Cool in fridge for an hour.  (My mom is very fond of saying “That’s forty minutes more than twenty minutes, Bonnie.  You have to be patient.”  She also tells me that measurements are there for a reason.  I’m more of a guestimator than a measurer =P )


And now, eat up! And share!  Also, store these in your fridge.  You don’t want them sitting out for any long period of time.
-Bonnie