Showing posts with label Tutorial. Show all posts

Friday, January 5, 2018

Double-Knit Change of Pace Scarf

This double-knit scarf uses a moss stitch for the “flat” stripes and knit stitches for the raised stripes.  Since it is double-knit, it is very warm.  With the number of stitches per row, it is also pretty wide and perfect for keeping you warm during the snowy months!  The fringe is optional, as is the cat fur.

Because this is double knit, I have labeled the rows by number and used 'A' and 'B' to label the two sides of the scarf.  The scarf is totally reversible, so there isn't really a front side or a back side.  If you have never double-knit before or would like a refresher, try this tutorial or any number of videos on Youtube The important thing to remember is that you need to move both pieces of yarn to the back for side A and to the front for side B.

Ombre yarns will yield similar color stripes as the scarf in the photos, but the pattern would also work with tweed, solid, striped, etc., so go for what you love best!

Materials
  • Suggested yarn: Loops & Threads Charisma (6 balls for scarf, 1 extra for fringe) (Color used in photos: Dusk)
  • Needle size: 9 mm (US 13)


Pattern

Cast on 35 stitches with each ball of yarn for a total of 70 stitches on your needle (or other multiple of 10 plus 5)

R1 A: *K1 P1 K1 P1 K1 K5* repeat 2 more times; last 5 stitches K1 P1 K1 P1 K1
R1 B: Same as R1 A

R2 A: *P1 K1 P1 K1 P1 K5* repeat 2 more times; last 5 stitches P1 K1 P1 K1 P1
R2 B: Same as R2 A

R3 A: Same as R2 A
R3 B: Same as R2 B

R4 A: Same as R1 A
R4 B: Same as R1 B

Repeat Rows 1 through 4 until scarf measures between 60 to 65 inches. 

Cast off.  Weave in ends.

Fringe

Tip: To make the fringe easier to assemble, use a crochet hook!

Cut out 144 pieces of yarn measuring between 8 to 12 inches (12 inches for longer fringe).  Take 2 pieces of yarn and fold in half.  Insert the folded edge into the selvedge stitch at the edge of the first row and use the crochet hook to pull the yarn tails through the loop (around the selvedge stitch).  Pull to tighten.  Repeat every other stitch until the edge of the row.  Repeat steps for fringing the other edge of the scarf as well.  For a fuller fringe, try adding yarn to every selvedge stitch instead of alternating ones.

Thursday, May 29, 2014

Personalized MagicBands

What's up, everyone? We haven't been on here in a little while but I had an excellent idea that I knew I would need to post about! First of all, I'm obsessed with Disney's MagicBands... Need more information? The Walt Disney World website has some excellent information on the subject! And this is a pretty picture-heavy post, just a fore-warning!

Red, Green, and Blue MagicBands with Magic Bandits

Between my husband and I, (Whoa! Is it possible the last time we posted we weren't married yet?! Crazy!) we have almost every color! I received my pink MagicBand in November of 2013 when we were staying on Disney property to celebrate our one year wedding anniversary (they were still in testing at this point), and Josh received blue. Earlier this year, we received our annual passholder bands and I chose yellow for me and orange for Josh. We stayed on property again, this time with family, and I selected red for me (Josh reused one of his MagicBands - Yes, you can do that!), and finally we will be staying on property with more family in the end of June, so we ordered green for me and red for Josh.

I love our MagicBands, but sometimes there's just something missing, and since we're well into our collection I decided I'd do some research on personalizing my MagicBand! Pinterest gave me some excellent ideas on what I could do to decorate them, and most of the ideas came from this post on DISboards. I couldn't wait to try it out! So far, I've decorated three of our MagicBands and they've turned out pretty great!

Not many supplies needed!


You'll Need:

  • A MagicBand
  • Nail Art Pens
  • Clear Nail Polish
Make sure your MagicBand is clean and you have a good work surface available! (I tried doing some designs last night when it was dark... Yikes! Good lighting is definitely key.) For my first design, I went with swirls, so I started to lightly sketch it out on the MagicBand with my white nail art pen. 

Sketch your design
Continue on with your design, adding or taking away as needed.

Continuing the sketch
At this point, after I switched to the other part of the MagicBand, I messed up my design! Oh no! It's completely permanent! What are we going to do?!

Nail. Polish. Remover. Easy as that! 

Nail polish remover works wonders!
After you've got the basic design you want, add little details! (And remember, when doing designs, you have to add a Hidden Mickey! I don't make the rules.)

Swirls & dots
After I got the main part of the MagicBand finished, I outlined the Mickey head (where the RFID chip is located) and added my initial "S" into it.

Outlined Mickey and "S"
I continued by adding glitter to a few of the dots and the other Mickey head... Then finally covered it in clear nail polish (after it dried for about a day) to seal everything in and give it a bit of a shine!


Add a bit of sparkle!
Here are some of the other designs I've created, as well! For the yellow/bee design, I simply used my black nail art pen and clear nail polish. For Josh's orange & blue striped MagicBand, I used tape (to created the stripes) and blue nail polish, then outlined the Mickey head using a nail art pen... Go Gators!

Can you spot the Hidden Mickey?

Not sure why the middle looks yellow... It's definitely orange!

But, it's definitely times like these that I wish Bonnie were here! She is so much more gifted with paint and definitely more patient than I am! If you paint your own MagicBand, post a picture in the comments so we can see! Have a Magical Day, everyone!


Sunday, June 10, 2012

Lost and Found


Hey everyone, it’s Bonnie again (I know it's been ages)!

So it’s been a while since I’ve even had a chance to craft at all, what with working full time, being a full time student, and working on an art commission that literally takes up more space than me, but I had a desperate need to craft today.

See, here’s the deal: I like accessories.  I LOVE necklaces and earrings, especially.  My problem?  That I can never find what I want when I need it, and when I do it’s always tangled up in everything else.  I finally decided to solve the problem using this super fast, super easy craft.

What you will need:

You don't actually need a cat for this project.
  •  An unframed corkboard (whichever size you prefer)
  • Fabric (Enough to cover the corkboard and a little over each edge)
  • Stapler and Staples
  • Push-pins
  • Necklaces
  • Ribbon (Optional)
  • Glue (Optional depending on your presence or lack of ribbon)
  • Scissors
  • 2 long nails
  • Hammer
  • Wall space (Not optional)
Okay, so Step 1!:

Lay the fabric as flatly as possible over the front of the corkboard.  Trim the edges of the fabric, but try to leave about an inch and a half to fold over.  Flip the cork board upside down.

You can't see the corkboard, but I promise it's there.

Step 2:

Fold the fabric as neatly as possible, and try to keep it snug.  Open the stapler so you can lay it flat on the corkboard.  Press down (hard, otherwise the staples won’t always go in) near the edge of the corkboard, over the fabric.  Make sure the staple went in all the way as you go.  In an attempt to make sure the fabric was definitely being held in, I stapled along the back edge about every four to five inches.  Where the fabric was folded over twice (at the corners) I used about twice that.

Keca supervising the dangerous part

I'm building suspense by only showing you the back of the corkboard.
 
Step 3 (optional):

Once the fabric is nice and tight and connected to the corkboard, flip it over so the front is facing you again.  Cut an amount of ribbon that will border each side of your corkboard.  Using glue (I used memory glue, but fabric glue and probably even Elmer’s glue will work just fine) edge the fabric and then flatten the ribbon over it, trimming the edges if they’re just a little too long.  Your board should be looking super pretty about now!

I'm still building suspense by not showing you the whole picture.

Suspense ended.

Step 4:

Decide how you want to organize your necklaces, and put in your push-pins accordingly.  I really liked this part because I was starting to get excited about putting the corkboard up on my wall.  And also because I used lime green push-pins.

(I don't have a picture for this because the lime green push pins are slightly transparent and they blend right into the fabric...)

Step 5:

Put the corkboard against the wall, and in one top corner, place the nail and bang it through the wall using your hammer or tool of choice.  Make sure the corkboard is even, and then go to the other top corner and smash in the second nail.  The nails went through the cork board and the wall super easily for me, and it’s holding up really well.

(I also don't have a picture for this because it would have looked remarkably similar to the previous picture...but on a wall, not a rug.)

Step 6:

Hang up your necklaces!!!  I can’t find all of mine yet (which is no surprise because I lose just about everything), but you can see that not only does this make a good storage for jewelry, and a good organizer, it also makes a pretty sweet decoration.

I really am excited about it.  It holds up even my heaviest necklaces, and it looks great :)

Next, I plan on doing a smaller one for my earrings with a small plastic or metal tub beneath it to catch earrings in the event that they fall off…because if they fall behind one of my bookshelves, I’m never getting them back!  If I do manage, I'll add on a picture and an extra tutorial, if necessary :)

 Happy crafting!


Wednesday, February 29, 2012

Artwork Make-over

I know it's been a long time since either of us have posted, and I could definitely bore you of the details of school and work and wedding planning, but instead, I'm going to show you a tutorial, and explain how I get my inspiration.


I've followed a few craft blogs before, but not many. And during my little "hiatus" I discovered Pinterest. Pinterest is one of those things that if you never knew about it, you would go about your daily life, never realizing that you are missing out on a world of inspiration. I have to admit, I'm on Pinterest every day, some times multiple times a day, and I love sifting through all the crafts on the DIY & Crafts board. I've gotten so many wonderful ideas from the Food & Drink board, too! So you can look forward to a few tutorials from crafts I've seen on Pinterest!


This particular craft really caught my eye just as Bonnie and I were leaving for JoAnn's, and I decided I would try it, if I had the time. Who would have thought it would be one of the best crafts I've ever done? And seriously? One of the easiest! The original project was Song Lyric Wall Art / D.I.Y Project. Her's turned out so cute, I just had to try it myself! She did a tutorial on it, but instead of using liquid white paint, I used spray paint, and it turned out wonderful!


Supplies Needed:

  • Painting
  • Letter Stickers (I got mine from the scrapbooking section)
  • White (or another color) Spray Paint
  • Patience

First, take a painting (I picked mine up at JoAnn's, on clearance, for under $5).


Next, cut out the letters and place (without sticking) on the painting to get the exact positioning right!
We ran out of h's, so we had to improvise! Doesn't look too bad, does it?


Now, begin sticking the letters straight onto the painting! But, make sure you don't press them down too hard, you're going to be peeling them off in a little bit! And, as you can see, we used a straight edge to get perfect lines throughout.


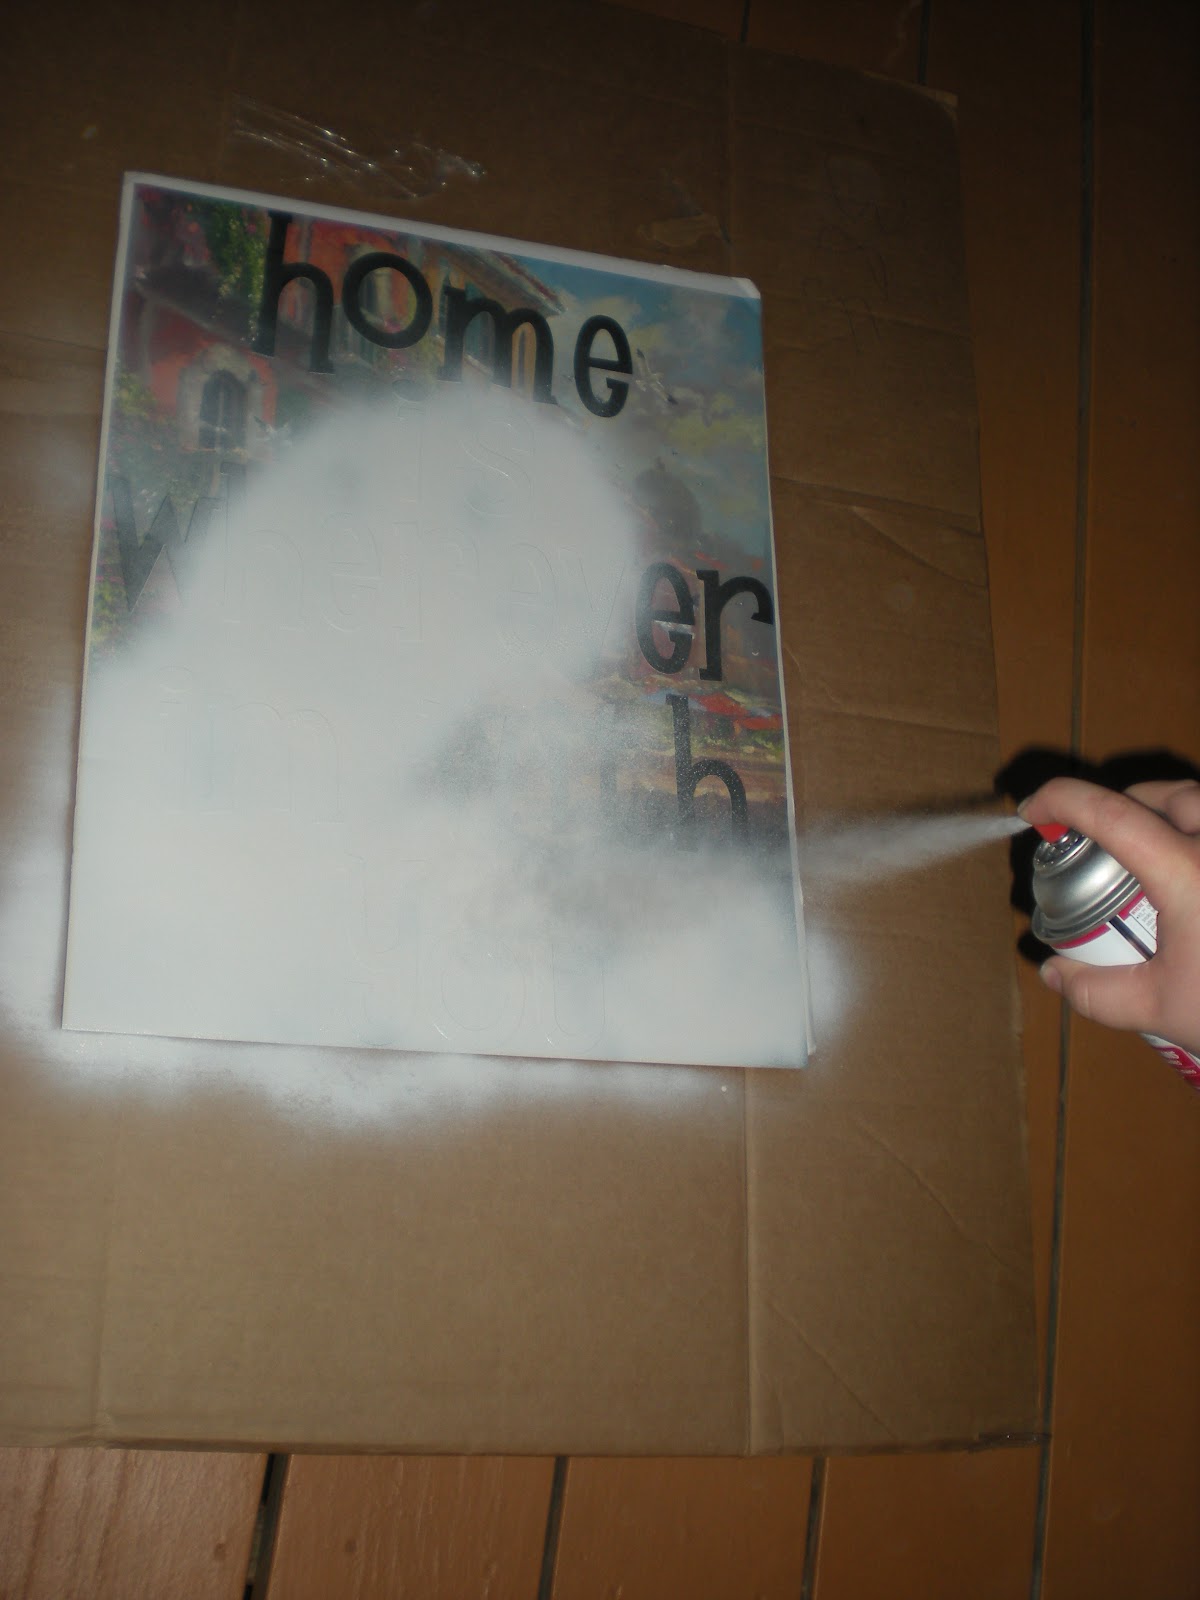
Get ready to spray paint! Make sure all the stickers are exactly where you want them to be.


And then take the painting out to a well-ventilated area and begin spraying! I sprayed in circles, mostly, then came back to the areas afterwards that needed a little more lovin'.


After you're finishing spraying, let the paint dry, but not completely. We waited about ten minutes, and used the time to catch up with each other! Then, carefully begin peeling the letters off. Having long nails really helps with this part!


Honestly, not all of the letters are going to come out absolutely perfect, and as you can see the picture above, there were some remenants of the letters, but you can go back afterwards, and peel those off, too! After you're finished peeling, marvel at your new artwork!


I'll be framing this beauty in a few days, I'm really looking forward to putting it up! Oh, and, as always, thanks for stopping by!


Sunday, April 24, 2011

Colors Make Me Happy (Especially in skirt form)


Hey there, people, let me be the first to say Happy Easter, if it is a holiday you celebrate!  If it is not, than Happy Random April Sunday to you!  So, I know I haven’t been posting on “odd days” lately, but it’s because odd days are just so inconveniently busy by some cruel joke dictated by the universe.  But that being besides the point, here’s a craft I randomly started working on about two or three weeks ago with the support of the ever-awesome Shelby who I miss and have not seen since then.  I don’t have many photos because I was more worried about not putting it down and losing interest than in documenting, so sorry about that!


What you will need:
  • Fabric squares (I find these in the calico/quilting section in art stores.  I’m not talking about the little ones, but the ones that are about 1.5 times larger than a bandana.)
  • Note: The number of fabric squares you want depends on multiple things.  For example, the width of your hips and behind, and the length you want the skirt to be.  I used 13 squares – 1 White (for the band), 1 Red, 1 Orange (they were nearer the top and therefore I needed less), 2 Yellow, 2 Green, 2 Light Blue, 2 Dark Blue (Indigo doesn’t exist anymore??? Excuse me for believing in all seven colors of the rainbow.), and 2 Purple.
  • Elastic (I used ¾ of an inch wide.  Look at the length and decide if it’s appropriate for you, and while ¾ width is okay, I suggest going about an inch.  Of course, I decided this after I finished sewing my skirt.)
  • Thread (You can match your threads if you want…I just used white.)
  • Sewing machine (Or just a needle and tons of patience.)
  • Scissors

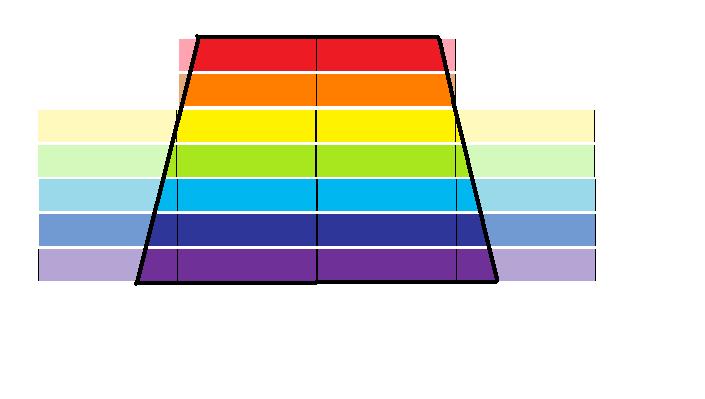
Step 1: Cut your fabric squares in half or into four lines so you have long strips instead of squares.  Sew matching colored strips together so you have longer strips of the colors.  To do this, sew the ends FACE TO FACE so the hem is on the inside.  Use that tactic throughout this tutorial.  The hem would look silly on the outside for this particular design.  Here’s a paint diagram of what it should look like (obviously multiply by 2 if you cut into four strips and not just in half.  I used four strips for my skirt.):

Etc.

Step 2: Sew these strips together in the order you want (I did the order of the rainbow).  Match the center seams together so the shorter strips are centered.  Do not sew the white strip (or whatever color you chose your band to be) with this. New paint diagram:

Note: I chose for the purple on the bottom of mine (not demonstrated in this diagram) to be longer than the length of the other colors.  When you sew the strips together, it should be front to front so the hem is on the inside.  Trim the excess.  To make the purple longer, sew the line closer to the end of the fabric, so there’s less excess to trim.

Step 3: Cut the fabric in a bell-like shape, demonstrated by this paint diagram:


Note: The top band should be able to wrap around your waist or hips (wherever you want the skirt to sit) at least 1.5 times.  I think mine was closer to 2 times, but I plan on trimming it down just a little.  So basically, aim for about 1.5-1.75 times the length of cloth you would need for a flat skirt!

Step 4: On the bottom of the skirt, fold up the fabric towards the inside, just a little.  Sew this all the way around the skirt to hem the bottom, partially so it has a clean look, and partially so it doesn’t thread.  Hems are multi-purpose, in case you didn’t know :P

Step 5: Sew the white strip (or whatever you color you chose the band to be) to the top of the skirt, face to face so the hem is on the inside.  This part is kind of hard – fold the white over (towards the inside) until you have just enough room for your elastic band.  Don’t make it too exact or small, because you need to thread the elastic through.  Sew the white cloth down, but DO NOT sew the ends shut.

Step 6: Measure the elastic around your hips or waist (this is where you’ll want the skirt to sit) and cut it so it’ll be snug but not too tight.  Start feeding it through the white-cloth-tunnel you just made.  Hold onto one end so it doesn’t disappear into the fabric!  When you have both ends sticking out of cloth, sew them together as stably as you can.  Pull the white band together over the elastic, and sew the ends of that together too, and continue sewing down the sides of the skirt so it’s all together now, face to face.  Your skirt should look something like this:


Step 7:  Flip the skirt right side out and spread the scrunched material around the elastic as evenly as you can.  Voila!  You have a rainbow-quilt skirt now :)


Good luck with this project! (And in case you were wondering, this is the first clothing item I’ve made without a pattern!  Patterned clothing pictures below, just because I’m proud of them :P )
This is the first thing I made with my sewing machine. I've made like ten million aprons since!
This is the first dress I made!

-Bonnie

Saturday, March 26, 2011

Strings and Beads and Butterflies, Oh My!

Okay, so unfortunately I lied (this is Bonnie, just so no one thinks Shelby lied!).  There was not a post yesterday, because something came up (something fun, so I actually feel guilty about not posting haha)!  But, here’s a post now, and I might actually put up a post later!  Or I might save it for later this week. (As an added bonus, it won't even be jewelry!)

I’ve been on a jewelry spiel lately.  I visited my grandma (I love visiting my grandma and grandpa <3 ) this last weekend, and we made bracelets together.  Usually I use wire, but she showed me how to make them using stretchy string, which I like even more.  Also, I love wearing bracelets.  On a given day, I’m usually wearing at least five.  Plus, this type of bracelet is easy to slip on and off!

Here’s what you’ll need:

(You can get this all in the beading section at Walmart or an art store.)
Stretchy string
Beads (I use assorted sizes…this time I used medium red and small turquoise)
Spacer beads (the silver butterflies in this case, but they have tons of options)
Scissors

 Step 1:
Cut off about fourteen inches of string.  If you want to measure your wrist first, feel free to do that.  (I’m not putting in measurements because I have tiny freaking wrists.  I read in a jewelry-making magazine that the average is between 8-10 inches.)  If you measure your wrists, make sure you leave AT LEAST THREE INCHES extra to tie, because this is slippery string.  You definitely want enough to get a grip on it!
This is steps 2 and 3


Step 2:

Pick out the beads you are using, as well as the spacers, and separate them.  Line them up in the pattern you want, so you can figure out about how many you will need.  As you can see, the pattern I used went T-R-T-B-T-R-T-B-T-R-T-B-T-R-T-B-T-R-T-B-T-R-T-B-T-R-T-B.  (T=Turquoise, R=Red, B=Butterfly.)  


Step 3:

Now that you have the beads laid out, you can start putting them on the string.

Tip: Hold one end of the string while you do this, so the beads don’t slip off.  You can see in the picture how I do it.  The end I have between my fingers is not the end I put the beads on.


Tip:Make sure you put the beads on in order!  I always try to make it a full circle with the pattern, but if you need to add more or less of the pattern to make it fit your wrist, don’t be bothered by two beads of the same color being side-by-side.  One of my other bracelets has that, and I always just face that side down to the inside of my wrist.

Step 4:

Wrap the beaded string around your wrist, but be careful because you don’t want to accidentally let go of one end.  (And no complaining that it’s difficult…I did it while taking a picture.  THAT was difficult =P)  If it fits well, you’re free to go on to the next step.  If it’s too small, add on a few beads and then repeat this step.  If it’s too big, take off a few beads and repeat this step.


Step 5:

Tie the knot!  I use a normal knot, and I usually tie it about five times so I’m sure it’ll stay tied.  Here’s the best way to do this: tie it to the person’s wrist, or tie it to your own wrist.  That way, the knots are nice and tight.  I didn’t have another person to tie it to (haha) so I just used a chair leg.  If you do this, make sure you can slip it off – don’t tie it somewhere that’s blocked on both ends!  


I slipped it around the chair leg, pulled it tight, and tied about five knots!  It might be hard to see in the picture, because I used clear string, but you should be able to make it out if you squint and tilt your head to the left (not the right…but I jest.  You should just be able to see it!).  


And now, place the bracelet on your wrist!  Yay, you have a bracelet!  (I made mine for my roommate Amie…she doesn’t know it yet, but here’s a few other bracelets I’ve made that I’m still in possession of, and how they look on and off the wrist.)


Tuesday, March 15, 2011

Don't Forget To Be Green :)

Here’s an interesting fact about me: My favorite holiday is St. Patrick’s Day.  I’m not even kidding!  I love Halloween, I enjoy Christmas, and I think Thanksgiving is great, but St. Patrick’s Day is the absolute best.  I don’t know what it is about dressing up in all green and teasing (most of) my friends who don’t wear green, but I look forward to it every year.  

One of my friends looked at me yesterday and said “I just realized St. Patrick’s Day is on a Thursday this year and I got really depressed.  You’re going all out again, aren’t you?” (To put that statement in context – we don’t see each other in class on Thursdays.)

And yes, yes I am going all out (again).  I’ve had this outfit planned for months now (because I’m sort of a dork like that).

But this wasn’t a huge tangent or anything.  This entire little explanation had a purpose.  St. Patty’s Day is in two days, and I’m helping you guys get in the cheer!  It’s a simple, little necklace to add green to your Thursday!

What you will need:
Wire (if you remember the fish bowl project, I used the same wire I used there.)
Small Green beads
Small Yellow bead s
Even smaller White beads
A necklace clasp
Two loops
A Shamrock Charm!!! (Also, another fun fact: My mom calls me Clover.  I have a huge attachment to Shamrocks/Clovers, etc.)
Needle Nose Pliers and Wire Cutters (or scissors if you don’t want to be fancy.)


Step 1: Loop a bit of the wire around your neck to determine the desired length.  Add a little bit of extra length (less than an inch) because you will probably trim/twist it down a little.  Clip the wire.  On one end, it doesn’t matter which, twist the wire into a loop (it should be somewhat small) and twist the end of it down a little, along the length of the rest of the wire.  Trim off the extra, and use the needle nose pliers to flatten the trimmed part, just a little so there aren’t any sharp edges.


Step 2: Use one of the loops.  Find the recess in it, and pull both ends of the loop sideways – you should not be pulling them apart by moving them back from each other!  One should be going left, the other right.  Slip the clasp onto this, and then move it onto the loop you made with the wire.  Using the needle nose pliers, press the two sides of the loop together.  


Tip: I tend to press the ends of the loop together so they overlap a little bit before I press the ends flat together.  That way, the way I see it, the clasp is less likely to slip off!


Step 3: Decide on the pattern you want.  You can lay it out before hand if you want, although for a necklace with beads this small I tend to not do that.  If it were a longer necklace, with a larger variety of beads, I would.  The pattern I chose was this: 9 Green – 2 Yellow – 9 White – 2 Yellow – 9 Green – Etc.


Keep slipping the beads onto the wire using this pattern (or whichever pattern you choose to use) until there’s about 3/4 of an inch left of the wire.  Just like the first step, you’re going to loop the wire and twist it around.  If you have an extra loop like the one you used with the clasp, you can put it on the wire-loop.  I didn’t, because since there’s already a loop on the wire now, you can just hook the clasp to that.


Step 4: With the last loop you have left (like the clasp-loop, not the wire-loops you’ve been making), use the pliers to open it up.  Hook your charm to it.  I added a little green bead behind the charm, just as a personal touch, but that’s all up to you.  Put the loop around any part of the necklace (I put it around the white beads since they’re smaller) and close it using the same technique you did for the clasp.  Try to leave it enough lee-way to move around a bit on your necklace; that way, even if the necklace twists behind you or something, the clover charm should still hang in the front!


Voila!  A little green necklace to keep you from being pinched by St. Patty-Day lovers like me ;) 

And just for fun, here’s a few other jewelry items I’ve made:


I’ll probably end up doing a tutorial on one of them at some point, so if you’re interested in any in particular, let me know!
-Bonnie (Clover)