Showing posts with label Shelby. Show all posts

Thursday, May 29, 2014

Personalized MagicBands

What's up, everyone? We haven't been on here in a little while but I had an excellent idea that I knew I would need to post about! First of all, I'm obsessed with Disney's MagicBands... Need more information? The Walt Disney World website has some excellent information on the subject! And this is a pretty picture-heavy post, just a fore-warning!

Red, Green, and Blue MagicBands with Magic Bandits

Between my husband and I, (Whoa! Is it possible the last time we posted we weren't married yet?! Crazy!) we have almost every color! I received my pink MagicBand in November of 2013 when we were staying on Disney property to celebrate our one year wedding anniversary (they were still in testing at this point), and Josh received blue. Earlier this year, we received our annual passholder bands and I chose yellow for me and orange for Josh. We stayed on property again, this time with family, and I selected red for me (Josh reused one of his MagicBands - Yes, you can do that!), and finally we will be staying on property with more family in the end of June, so we ordered green for me and red for Josh.

I love our MagicBands, but sometimes there's just something missing, and since we're well into our collection I decided I'd do some research on personalizing my MagicBand! Pinterest gave me some excellent ideas on what I could do to decorate them, and most of the ideas came from this post on DISboards. I couldn't wait to try it out! So far, I've decorated three of our MagicBands and they've turned out pretty great!

Not many supplies needed!


You'll Need:

  • A MagicBand
  • Nail Art Pens
  • Clear Nail Polish
Make sure your MagicBand is clean and you have a good work surface available! (I tried doing some designs last night when it was dark... Yikes! Good lighting is definitely key.) For my first design, I went with swirls, so I started to lightly sketch it out on the MagicBand with my white nail art pen. 

Sketch your design
Continue on with your design, adding or taking away as needed.

Continuing the sketch
At this point, after I switched to the other part of the MagicBand, I messed up my design! Oh no! It's completely permanent! What are we going to do?!

Nail. Polish. Remover. Easy as that! 

Nail polish remover works wonders!
After you've got the basic design you want, add little details! (And remember, when doing designs, you have to add a Hidden Mickey! I don't make the rules.)

Swirls & dots
After I got the main part of the MagicBand finished, I outlined the Mickey head (where the RFID chip is located) and added my initial "S" into it.

Outlined Mickey and "S"
I continued by adding glitter to a few of the dots and the other Mickey head... Then finally covered it in clear nail polish (after it dried for about a day) to seal everything in and give it a bit of a shine!


Add a bit of sparkle!
Here are some of the other designs I've created, as well! For the yellow/bee design, I simply used my black nail art pen and clear nail polish. For Josh's orange & blue striped MagicBand, I used tape (to created the stripes) and blue nail polish, then outlined the Mickey head using a nail art pen... Go Gators!

Can you spot the Hidden Mickey?

Not sure why the middle looks yellow... It's definitely orange!

But, it's definitely times like these that I wish Bonnie were here! She is so much more gifted with paint and definitely more patient than I am! If you paint your own MagicBand, post a picture in the comments so we can see! Have a Magical Day, everyone!


Monday, October 22, 2012

It's the Bridal Showdown...

Just kidding, it's not really a showdown.  However, it does have to do with wedding and bridal stuff :)  As has been referred to in past posts, Shelby is soon to be married.  Like, really soon.  You know what that means?  A lot of last minute crafts.  A lot of them.  So many.  But it's cool, because we're really getting to do new and exciting things!

Now, this past weekend was Shelby's (south) Bridal Shower, since there was a handful of us down here in Florida who couldn't make it to the original Bridal Shower with her family up north.  I was in charge of games and entertainment and Cindy, a family friend, hosted the shower at her house and supplied a wonderful, beautiful menu.  My problem was that because Shelby had already had one shower, I didn't want to repeat games she may have played already.  I had trouble finding nicely set-up games that were appropriate for the forum, so in the end I worked with a mix of game ideas I found online and some that I made up from board games or ideas I had heard about at some point.  This post is to outline the six games we played so the next maid-of-honor who needs to plan a shower doesn't have to risk the dangers of the unexplored internet.

Game 1: Steal the Veil!
Start this game at the very beginning of the shower.  Everybody gets a metal ring, similar to binder ring clips, with five strips of tulle.  If you've seen those DIY tutu posts on pinterest, you'll know how to do this.  If not, it's super simple: fold the strip in half and put one end through the metal ring.  Fold the loose ends through the loop the folded side of tulle forms, and tug it tight.

Everyone can attach this to their sleeve or necklace or pant loop - whatever is the most convenient.  Choose 3 "Forbidden" words.  Each time during the shower that someone uses one of those words, the person who catches them saying it gets one of their "veils."  At the end of the shower, whoever has the most wins!  (Our forbidden words were "Cruise," "Josh," and "Wedding."  Shelby totally lost.  Josh's mom won.)

Game 2: Bridal Bingo!
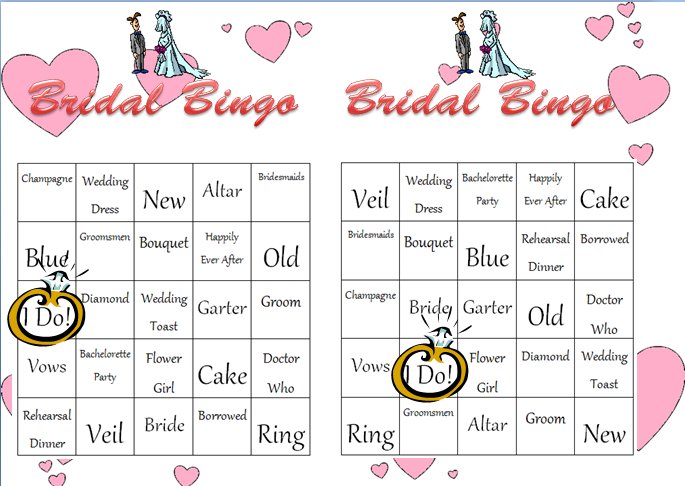
This one is pretty self explanatory.  Make a 5X5 board.  Each square in the grid gets a word related to the wedding or couple.  Make sure each party attendee has a board that is DIFFERENT from the others, so the words should all be in another square.  I'll add the 6 boards that I made below.  Print out one extra board to cut up and stick in a bag to use as the calling cards.  You'll see that there is a ring around the "I Do" square on these boards.  We used those as the freebies.


I printed these on nicer photo paper to make them a little fancier, and I cut out squares of three different shades of pink scrapbook paper the size of each grid piece to cover the words that were called.  This ended up being a hit, and we played it more than once.

Game 3: Wedding Scategories!
I chose 9 wedding/love related categories and typed them up on a pretty graph in Microsoft Word.  At the shower, we had Shelby pick a random letter (she chose "J") and we all had one minute to try to fill in the 9 categories with something starting with that letter.  Afterword, we all compared answers, and in the end the person who had more different answers than everyone else won.


Game 4: Bride or Groom?
For this one, I went on Facebook and copied/pasted random status messages from Shelby and Josh going as far back as I possibly could to make it really hard.  I kept one sheet of paper that said who said what, my cheat-sheet to grade everyone else's answers, and then took out anything that specified gender or name from the status messages.  I arranged them in a chart with two check boxes beside each status message so the attendees could mark who they thought posted it.  Below is an example of the sheet I used.


I added a couple extra status messages on my cheat sheet in case there needed to be a tie-breaker, but Shelby won (only by 1 point) so it wasn't necessary :)

Game 5: Pass the Bouquet!
Think Hot Potato, but without the hot potato.  I bought a little bundle of flowers and wrapped them in a pretty silver tulle with some nice ribbon to make it look like a wedding bouquet.  We all sat in a circle and the tossing of the bouquet began - to anyone in the circle.  I played "Marry Me" by Train on my iPod and paused it randomly.  The person holding the bouquet was out, and the circle closed in until only one person was remaining.  Cindy was the winner with the bouquet!  I'll make sure to add pictures later, because it was quite fun :)

Game 6: Wedding Pictionary!
For this game, I made a list of wedding/couple related words.  I printed the list and cut it into strips, mixing it up in a plastic baggie.  We had some dry-erase markers and a white board set up at the front of the room.  Shelby started the game by pulling a slip of paper from the bag and drawing it on the board until we guessed what it was.  The person who guessed got to pull the next slip of paper and go up to draw, and so on so forth.  I'll add pictures of this later, too, but for now here's the list we used:


And that, my dear readers, is the sum of our Bridal Shower games!  I'll make another post soon with the DIY game prizes, because they were a HUGE success.  If you're planning a wedding, or planning a shower, I wish you the best of luck :)

-Bonnie


Wednesday, February 29, 2012

Artwork Make-over

I know it's been a long time since either of us have posted, and I could definitely bore you of the details of school and work and wedding planning, but instead, I'm going to show you a tutorial, and explain how I get my inspiration.


I've followed a few craft blogs before, but not many. And during my little "hiatus" I discovered Pinterest. Pinterest is one of those things that if you never knew about it, you would go about your daily life, never realizing that you are missing out on a world of inspiration. I have to admit, I'm on Pinterest every day, some times multiple times a day, and I love sifting through all the crafts on the DIY & Crafts board. I've gotten so many wonderful ideas from the Food & Drink board, too! So you can look forward to a few tutorials from crafts I've seen on Pinterest!


This particular craft really caught my eye just as Bonnie and I were leaving for JoAnn's, and I decided I would try it, if I had the time. Who would have thought it would be one of the best crafts I've ever done? And seriously? One of the easiest! The original project was Song Lyric Wall Art / D.I.Y Project. Her's turned out so cute, I just had to try it myself! She did a tutorial on it, but instead of using liquid white paint, I used spray paint, and it turned out wonderful!


Supplies Needed:

  • Painting
  • Letter Stickers (I got mine from the scrapbooking section)
  • White (or another color) Spray Paint
  • Patience

First, take a painting (I picked mine up at JoAnn's, on clearance, for under $5).


Next, cut out the letters and place (without sticking) on the painting to get the exact positioning right!
We ran out of h's, so we had to improvise! Doesn't look too bad, does it?


Now, begin sticking the letters straight onto the painting! But, make sure you don't press them down too hard, you're going to be peeling them off in a little bit! And, as you can see, we used a straight edge to get perfect lines throughout.


Get ready to spray paint! Make sure all the stickers are exactly where you want them to be.


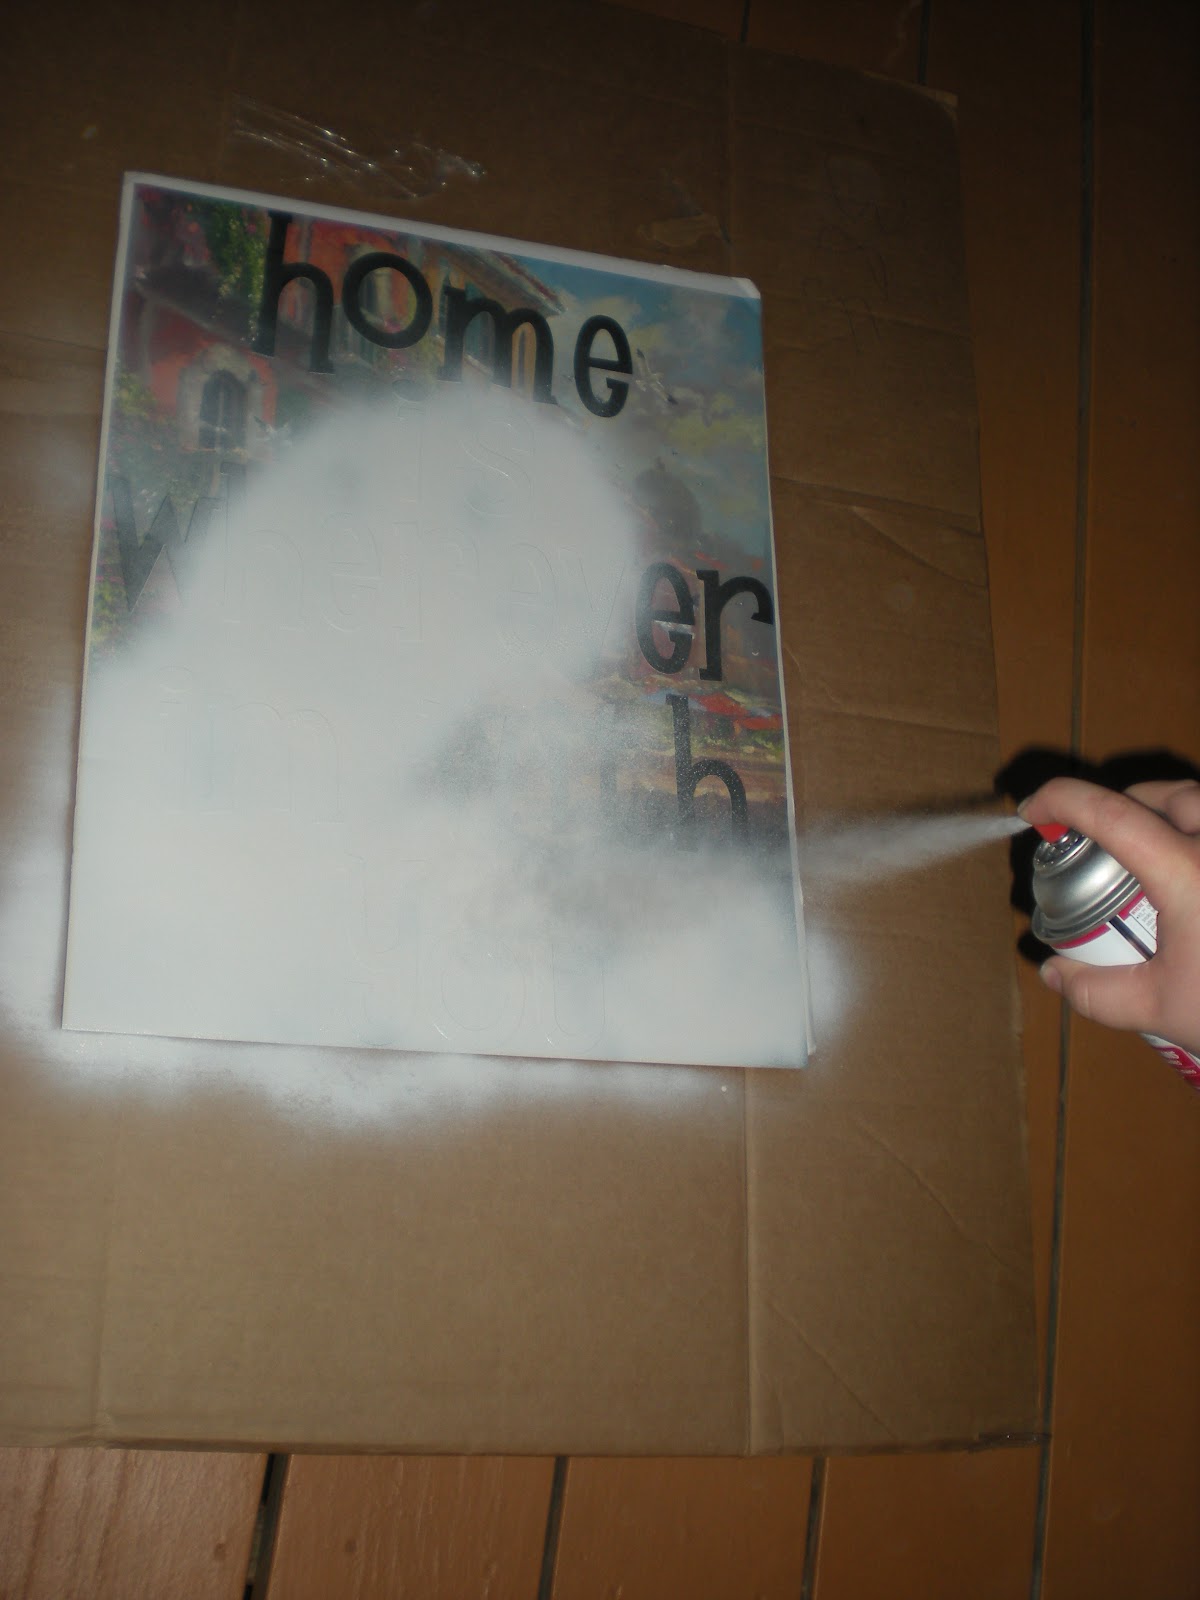
And then take the painting out to a well-ventilated area and begin spraying! I sprayed in circles, mostly, then came back to the areas afterwards that needed a little more lovin'.


After you're finishing spraying, let the paint dry, but not completely. We waited about ten minutes, and used the time to catch up with each other! Then, carefully begin peeling the letters off. Having long nails really helps with this part!


Honestly, not all of the letters are going to come out absolutely perfect, and as you can see the picture above, there were some remenants of the letters, but you can go back afterwards, and peel those off, too! After you're finished peeling, marvel at your new artwork!


I'll be framing this beauty in a few days, I'm really looking forward to putting it up! Oh, and, as always, thanks for stopping by!


Friday, March 11, 2011

It's Never Too Late!

Unless, of course, I post two days late.... Whoops! Sorry, guys, things have been pretty crazy over in Shelby-Land, work, stressing out over Doctor's appointment, trying not to kill my cats for throwing up on my blanket... Yikes. Anyways! I love home decor... Used to work for HomeGoods, in fact, so my obsession was usually handled with that paycheck... I used to say that money would just cycle through. No more! No more will I pay $15 for a little sign that goes on my front door. Never again! Here's a tutorial that will help you make a cheaper, better looking, more personalized sign!

What You Need:

  • Scrapbook Paper (I used 2 different colors)
  • Mod Podge
  • Paint (A base color, and a writing color)
  • A wooden sign
  • Paintbrush


This is everything I used! I, of course, had the Mod Podge on hand, as well as the paintbrush... The different paints and scrapbook paper were all 50 cents each, and the sign was $2, I wanna say? Don't quote me on that!


Begin painting, with your base color, the entire sign... Front to back, sides, everything. And yeah, look how fancy I am, using paper and whatnot!


Make sure you get the sides, too, especially if you're using a sign like this one... They do tend to move around, so you don't want anything wood-colored...


After the paint dries... Trust me, you don't wanna skip that step! Take a piece of your scrapbook paper and put your sign on top of it... Flip the paper over, and begin tracing the shape of the sign.


Easy enough, don't get any pen/pencil on your sign, now!


All the hearts are traced!


Cut 'em out! I cut them a little bit inside the lines, just so I knew I wouldn't be going over the hearts.


If you have a second color, repeat the cutting process with that one. Then lay the paper on top of the hearts how you want the design to look.


And start Mod Podge-ing! Put a layer of Mod Podge onto the sign, then lay the paper over top and do another coat ontop of it... After that one dries, do another layer.


Cute, huh?


Keep going until you have all sides done! As you can see, with the smallest heart, there's a little paper going over the edge... Go ahead and sand that off, easy enough!


After you're done sanding, and whatnot... Do another coat of Mod Podge.


When using Mod Podge, I usually always take the brush in one direction, always turns out nicer!


Go ahead and paint some words on there with your darker paint... And wait for it to dry, maybe doodle some...


Then write the same words again on the back... Like I said earlier, this thing will be moving and twisting, so we want the saying to make sense no matter what!


After you're done, have your Fiance reward you with a bread bowl full of hot Chicken Pot Pie soup... Yummm... Happy life! Happy Crafting!

Saturday, March 5, 2011

Red Flowers In Her Hair


Bonnie and I went to Claire's the other day. Yes, the preteen store that sells stuffed animals, Justin Bieber merchandise (yikes!), and fake jewelry. You know what? They have the cutest hair stuff, EVER! I found an adorable flower clip... For $7. SEVEN DOLLARS. That is ridiculous! It's fabric glued onto a clip. It cost them, what, like a dollar to make ten of them? I decided I could easily make some hair things for myself... So, I set out a mission. I already have everything I need... So this project, for me, is completely free! Yay!

First off, you're gonna need:

  • Some Fabric (I used an old red shirt... Got it for $2! But it just never fit me right!)
  • Fabric Glue and/or Needle & Thread
  • Scissors
  • Hair Clips

Just as a side note... These pictures are pretty terrible. I had gone through and taken pictures originally (great shots, too!) but found out I didn't have my memory card in! Dang!


Anyways! For the first hair accessory, I made a rose. To do this, cut up the fabric into strips, and then slowly wrap them around each other. While doing this, I folded some of the strips over, and did some higher than the others. Keep adding strips until you feel like it's large enough, all the while, adding fabric glue (or sewing it)...


I ended the rose around here... It was starting to get heavy because of the fabric I had used. After you feel like you've finished, glue a small piece of fabric onto the back, this way your clip has something to hold onto.


(Sorry for the blurry picture) You can probably see the little flap I have there... It's for the clip to go into, that way you don't have to have a clip for each accessory, and you can just transfer the clips from flower to flower!


Here it is with the clip on the fabric... Also, wearing pajamas! That's how I roll.


Tiger-Lily was quite interested in it!


This is what it's like in hair! Sorry, my hair was still wet! I wouldn't suggest actually wearing them in your hair while it's wet though... Could ruin the fabric! And that would be so sad. So, anyways... I made a bow (you know how much I love bows!) and another little ribbon flower with a ric-rac rosette! I feel like the bow is pretty much self-explanatory, but I'll show you some pictures anyways!


Most bows are made with ribbons, but I decided to do mine in fabric. I used fabric glue for the edges, to straighten them out and then decided that I would sew the middle in order to bring it together...


Here it is, all gathered and what not. Add a ribbon and glue it on!


Put the clip in behind and enjoy it's adorableness!


Here's a picture of the ribbon flower, as well... I'm not a huge fan of this one, but it would be perfect for a young girl!