Showing posts with label Crafts. Show all posts

Thursday, May 29, 2014

Personalized MagicBands

What's up, everyone? We haven't been on here in a little while but I had an excellent idea that I knew I would need to post about! First of all, I'm obsessed with Disney's MagicBands... Need more information? The Walt Disney World website has some excellent information on the subject! And this is a pretty picture-heavy post, just a fore-warning!

Red, Green, and Blue MagicBands with Magic Bandits

Between my husband and I, (Whoa! Is it possible the last time we posted we weren't married yet?! Crazy!) we have almost every color! I received my pink MagicBand in November of 2013 when we were staying on Disney property to celebrate our one year wedding anniversary (they were still in testing at this point), and Josh received blue. Earlier this year, we received our annual passholder bands and I chose yellow for me and orange for Josh. We stayed on property again, this time with family, and I selected red for me (Josh reused one of his MagicBands - Yes, you can do that!), and finally we will be staying on property with more family in the end of June, so we ordered green for me and red for Josh.

I love our MagicBands, but sometimes there's just something missing, and since we're well into our collection I decided I'd do some research on personalizing my MagicBand! Pinterest gave me some excellent ideas on what I could do to decorate them, and most of the ideas came from this post on DISboards. I couldn't wait to try it out! So far, I've decorated three of our MagicBands and they've turned out pretty great!

Not many supplies needed!


You'll Need:

  • A MagicBand
  • Nail Art Pens
  • Clear Nail Polish
Make sure your MagicBand is clean and you have a good work surface available! (I tried doing some designs last night when it was dark... Yikes! Good lighting is definitely key.) For my first design, I went with swirls, so I started to lightly sketch it out on the MagicBand with my white nail art pen. 

Sketch your design
Continue on with your design, adding or taking away as needed.

Continuing the sketch
At this point, after I switched to the other part of the MagicBand, I messed up my design! Oh no! It's completely permanent! What are we going to do?!

Nail. Polish. Remover. Easy as that! 

Nail polish remover works wonders!
After you've got the basic design you want, add little details! (And remember, when doing designs, you have to add a Hidden Mickey! I don't make the rules.)

Swirls & dots
After I got the main part of the MagicBand finished, I outlined the Mickey head (where the RFID chip is located) and added my initial "S" into it.

Outlined Mickey and "S"
I continued by adding glitter to a few of the dots and the other Mickey head... Then finally covered it in clear nail polish (after it dried for about a day) to seal everything in and give it a bit of a shine!


Add a bit of sparkle!
Here are some of the other designs I've created, as well! For the yellow/bee design, I simply used my black nail art pen and clear nail polish. For Josh's orange & blue striped MagicBand, I used tape (to created the stripes) and blue nail polish, then outlined the Mickey head using a nail art pen... Go Gators!

Can you spot the Hidden Mickey?

Not sure why the middle looks yellow... It's definitely orange!

But, it's definitely times like these that I wish Bonnie were here! She is so much more gifted with paint and definitely more patient than I am! If you paint your own MagicBand, post a picture in the comments so we can see! Have a Magical Day, everyone!


Sunday, June 10, 2012

Lost and Found


Hey everyone, it’s Bonnie again (I know it's been ages)!

So it’s been a while since I’ve even had a chance to craft at all, what with working full time, being a full time student, and working on an art commission that literally takes up more space than me, but I had a desperate need to craft today.

See, here’s the deal: I like accessories.  I LOVE necklaces and earrings, especially.  My problem?  That I can never find what I want when I need it, and when I do it’s always tangled up in everything else.  I finally decided to solve the problem using this super fast, super easy craft.

What you will need:

You don't actually need a cat for this project.
  •  An unframed corkboard (whichever size you prefer)
  • Fabric (Enough to cover the corkboard and a little over each edge)
  • Stapler and Staples
  • Push-pins
  • Necklaces
  • Ribbon (Optional)
  • Glue (Optional depending on your presence or lack of ribbon)
  • Scissors
  • 2 long nails
  • Hammer
  • Wall space (Not optional)
Okay, so Step 1!:

Lay the fabric as flatly as possible over the front of the corkboard.  Trim the edges of the fabric, but try to leave about an inch and a half to fold over.  Flip the cork board upside down.

You can't see the corkboard, but I promise it's there.

Step 2:

Fold the fabric as neatly as possible, and try to keep it snug.  Open the stapler so you can lay it flat on the corkboard.  Press down (hard, otherwise the staples won’t always go in) near the edge of the corkboard, over the fabric.  Make sure the staple went in all the way as you go.  In an attempt to make sure the fabric was definitely being held in, I stapled along the back edge about every four to five inches.  Where the fabric was folded over twice (at the corners) I used about twice that.

Keca supervising the dangerous part

I'm building suspense by only showing you the back of the corkboard.
 
Step 3 (optional):

Once the fabric is nice and tight and connected to the corkboard, flip it over so the front is facing you again.  Cut an amount of ribbon that will border each side of your corkboard.  Using glue (I used memory glue, but fabric glue and probably even Elmer’s glue will work just fine) edge the fabric and then flatten the ribbon over it, trimming the edges if they’re just a little too long.  Your board should be looking super pretty about now!

I'm still building suspense by not showing you the whole picture.

Suspense ended.

Step 4:

Decide how you want to organize your necklaces, and put in your push-pins accordingly.  I really liked this part because I was starting to get excited about putting the corkboard up on my wall.  And also because I used lime green push-pins.

(I don't have a picture for this because the lime green push pins are slightly transparent and they blend right into the fabric...)

Step 5:

Put the corkboard against the wall, and in one top corner, place the nail and bang it through the wall using your hammer or tool of choice.  Make sure the corkboard is even, and then go to the other top corner and smash in the second nail.  The nails went through the cork board and the wall super easily for me, and it’s holding up really well.

(I also don't have a picture for this because it would have looked remarkably similar to the previous picture...but on a wall, not a rug.)

Step 6:

Hang up your necklaces!!!  I can’t find all of mine yet (which is no surprise because I lose just about everything), but you can see that not only does this make a good storage for jewelry, and a good organizer, it also makes a pretty sweet decoration.

I really am excited about it.  It holds up even my heaviest necklaces, and it looks great :)

Next, I plan on doing a smaller one for my earrings with a small plastic or metal tub beneath it to catch earrings in the event that they fall off…because if they fall behind one of my bookshelves, I’m never getting them back!  If I do manage, I'll add on a picture and an extra tutorial, if necessary :)

 Happy crafting!


Sunday, February 13, 2011

A Head Full of Fluff

(This five-hour project brought to you by Bonnie <3 ....but just kidding, it didn't take a WHOLE five hours.)
A Head Full of Fluff

You Will Need:
A ball of yarn (Double-twine or fluffy yarn, for best result)
A round loom (Less than $15 for a set at most art stores, in the knitting section)
A little knitting hook (Usually found in loom set)
Scissors
Ruler (I didn’t use one…but feel free to!)


Step 1: Tie a slip knot at the end of the yarn!  If you do knot (pun intended) know how to do this, check out this link:  http://www.wikihow.com/Make-a-Slip-Knot  (If you have a lot of trouble with the step, just loop it tightly over the peg.  The slip knot is just there to make sure the yarn stays in place.)

Step 2: Tighten the slip knot onto the knob sticking off to the side!

Step 3: Cast yarn onto all the pegs.  This part seems complicated, but it’s not!  Bring the yarn up from the sideways knob, slip it through the first two pegs.  Going to the right, bring it around the peg, all the way.  You should be back behind the peg.  Carry it on to the next peg, and repeat the same step.  Continue.  


Step 4: Press the completed loops down to the bottom of the pegs.  Repeat step 3.  You should have two separate lines of loops on each peg, now.


Step 5: Pick up the hook, now!  Slip it under the bottom loop of the first peg.  Carefully use it to lift this bottom hoop OVER the top one.  Complete this for all pegs.  Now repeat step 4 (including the “Repeat step 3”).


This is going to continue for a while.  

Tip: Sometimes, to avoid the yarn unlooping itself during the beginning of Step 5, I go clockwise instead of counterclockwise when I use the hook to carry the bottom loop over.  If you have trouble with the yarn unlooping itself a little, try doing it this way!

Step 6: Periodically measure the length of your hat.  Suggested length is 7-8 inches.  I usually carry on a little further, because I want the hat to fully cover my ears.  

Your hat is going to look like this while on the loom:
This is the inside of the hat! (Or it will be, eventually.)

This will be the outside! (Eventually =P)


Step 7: Once the hat is at a desirable length, cut the yarn about four or five inches from the hat. 
With the yarn left in the original pile/roll of yarn, cut off a length of about twelve inches.   
If you want to make this part a little longer, that’s fine.  


Step 8: Use the hook to scoop the first loop of yarn on the loom.  Lift it over the peg.  Using the loose strand
of cut yarn, slip it through the loop.  Continue on to the next peg.  Make sure the loose strand of yarn doesn’t
leave any of the loops!  You want both ends of the yarn to meet when you get to the end of the circle.

 
Step 9: Your hat should be off the loom now.  There should be three loose strands of yarn on top.  Take
these, and pull them to the INSIDE of the hat.  Tighten them until the top of the hat is fully closed, and then 
knot them all together until you’re confident that your hat will stay in one piece.  Cut the excess off.


Step 10: The bit of yarn at the hem with the slip knot should still be there.  Loop it around a stitch in the hat 
and it off.  Cut the excess yarn.  


Voila!  You have your very own hat!!!

Saturday, February 5, 2011

Drinking From a Fish Bowl!


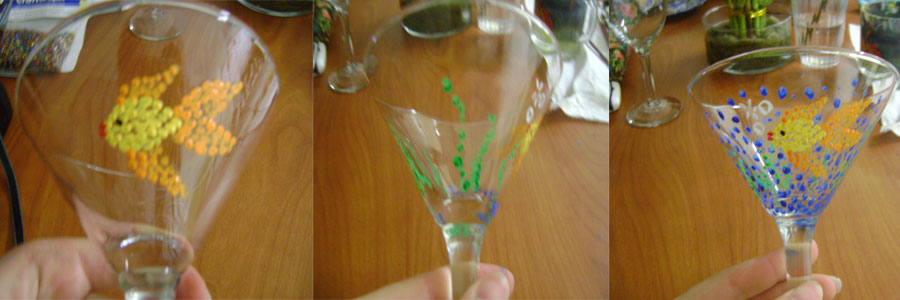
So I tried something new the other night – I painted glasses!  As in the drink-from glasses, not the balance-on-your-nose-and-ears glasses.  It was reasonably cheap, and they came out super awesome!  I’ll probably just use them as decoration, but they’re dishwasher safe ;)

What You’ll Need:
A glass item of some sort (I chose a martini glass and a wine glass because of the stems.  I also bought both at the dollar store.)
Glass paint (You can find this at art stores, usually in the same aisle as the bottled acrylic paint.)
Paint brushes
Wire (I used 20 gauge.  The lower the number, the thicker the wire.  The thinner wires break easily, so keep that in mind!)
Beads (Whatever colors you want, make sure they fit on the wire)


(The plant is not necessary.  It adds to the picture though, don't you think?)


Okay, so first things first.  Wash the glass items!  I know most people will snort and refuse this step, but honestly it will make the paint go on nicer.  And you won’t be trapping nasty dust particles between the paint and glass.
 
Are your glass items washed?

If so, then on to this step: begin painting! =D  I know, it’s easier said than done.  But here are a few tips: Don’t paint too close to the rim of the glass.  You want to be able to sip from the glass without drinking paint.  Also, don’t paint on the inside of the glass.  I hope that one was kind of obvious.  If you don’t know what to paint, here are a few ideas!

  • ·         A fish! (I did this one!)
  •  The fish in three steps - yellow oval, orange fins, and then two red dots as lips and one black dot for an eye!  Wavy green lines = seaweed.  Blue dots, thicker at bottom, more sparse at top = water!


  • ·         Flowers
  • ·         Peace signs (I also did this one!)

  • ·         Words (I wrote: Happiness, Peace, and Love on the Peace sign glass!)
  • ·         Colorful dots (or hearts- I separated the words with tiny blue hearts for the peace sign glass =P)
  • ·         Designs
  • ·         Leaves
  • ·         Shoes
  • ·         Paw prints
  • ·         Etc.
I painted using dots, mostly because it gave me an excuse not to be too detailed. 

THIS STEP IS IMPORTANT
You have to WAIT.  I don’t mean you have to wait for it to dry, I’m saying wait about 2 days, unless your glass paint has different directions on it.  When the allotted amount of waiting time is up, there are more directions.  However, there is something you can do in the mean time!

Cut off about a foot, maybe a foot and a half if you want it to cover most of the stem, of wire.  Twist one end into a small, temporary loop, so the beads don’t fall off.  Begin dropping on the beads.  I used mostly smaller beads, with a bigger one dropped in every now and then, just to add to it.  Twist another loop at the opposite end of the wire, once you’re done beading it.  Put these strands of beads aside.  They will go on the glasses later. (Note: These bead strands can really only be used for the glass items with stems!  Thus, the reason I used a martini glass and a wine glass.  If you used, say, a bowl or plate the beads will not work!)
(For the fish, thus the little shell beads.  I don't suggest them.  They don't lay quite right on the foot of the glass :( )

When your glass items are ready for the oven, put them in.  This means DO NOT preheat your oven.  That would be a bad thing.  Just put your glasses in, turn the oven up to 325, and set the timer for ten minutes.  When the buzzer goes off, take your glasses out and wait for them to cool down.  The paint is now dishwasher safe.  

Unloop one of the wire-loops, and reloop it around the bottom of the stem.  Start twisting the beaded wire up the stem, around and around.  At the top, unloop the temporary loop, and reloop it around the top of the stem.  Voila!  Cute little glasses :)

Monday, January 31, 2011

Short... But, Oh, So Sweet

Hey everyone, it's Shelby! The past few days have been pretty hectic for me but, as always, they've been very good! Bonnie and I went to a Bridal Show yesterday (along with the Fiance and his Momma!) and it was so fun! It was the first Bridal Show any of us had been to, so it was definitely a brand new experience. Lots of vendors, lots of other Brides and free goodies! We had this Almond Cake with Chocolate Kahlua frosting that was SO DELICIOUS, even the Fiance loved it, and he's usually so picky! Anyways... Because I haven't had much time, and because I don't have much time tonight, (I have my first day of work at a new job tomorrow!) I won't be doing a tutorial today, but I will be showing you some of the things I've done lately!


First off is a Rosette necklace, adapted from Craftify It! I'll post a link to it at the end of this post!


It's definitely one of the easiest crafts I've made in a very, very long time! Well, except for this next craft...


Super simple (and super adorable!) tray! I've noticed a lot of blogs featuring something called "Mod Podge", and I had never heard about it... But, let me tell you something: It's amazing.


I bought the tray, scrapbook paper (the hearts), the paint, and the Mod Podge all from Hobby Lobby, for super cheap, most on sale! I then painted the tray brown (just a few coats), cut out the hearts, and Mod Podged (is that the right past tense?) them away! It's still not quite done, I'm going to paint the bottom brown and possibly Mod Podge some more hearts on to the sides or something!

Hopefully, I'll find some extra time this week to feature a real tutorial for you to enjoy! Until then, have an odd day! (Get it? Hehehe) Oh! And I'm linking up to: Craftify It

Tuesday, January 25, 2011

Clothes Line Pictures!

It’s Bonnie again!  And I have a new project ^.^

So I know last time I did that quilted owl pillow.  Let’s face it, even if it’s not “complicated” it’s time consuming.  This time, I’m posting something way less time consuming!  Yay!
This is something I first saw with my wonderful roomie, Amie:


Adorable, sí?
And because it is just oh-so-very-adorable, I’m going to show you how to do it!

You will need:
Hemp (or if you prefer, yarn, twine, string, etc.)
Clothes Pins (I bought a pack of 36 at the dollar store.  For $1.)
Acrylic Paint (I understand most people don’t have this just laying around like me, but it’s reasonably cheap at art stores, and you only  need as many colors as you want.  I used six for the –newly changed- colors of the rainbow.)
Paint brush
Black permanent marker (I used fine, but the regular size will probably be better, or thick if you want to do different patterns.)
Photos
Two push pins

Step 1: Figure out how many pictures you want to put up.  This will determine how many clothes pins you need.  I used eighteen, and my “clothes line” is somewhere between 3 and 4 feet long.  (I do have pictures on top and bottom, though, because I like taking up space.)
Take out the number of clothes pins you need.  Now you have another decision to make.  I did NOT paint all of my clothes pins because I like the mixed look with natural wood color and bright rainbow colors.  If you would like to keep some of them plain, remember to put them aside!

Step 2: Lay out two sheets of newspaper so you don’t get paint everywhere.  (You’ll want to be doing this on a flat surface, by the way!) Separate your clothes pins into piles for the colors you want.  Choose your first victim, pour the paint, and paint the clothes pin!


Tip: You don’t need to paint the whole clothes pin.  If you know which side you want against the wall and don’t want to risk the paint rubbing off, then don’t paint that side.  I painted the front, the sides, and the part that closes on whatever it’s clipped to.

Lay the clothes pins on the second sheet of newspaper to dry.  Once you’re done painting them, leave them there to dry!  Acrylic paint dries pretty quickly, especially if you don’t pile the paint on.  I usually wait about thirty minutes for it to dry.  In the meantime, you have something to do!

Step 3: When you know where you want it, put the two pins in the wall where you’ll tie the line.  I used hemp for my line, so just know when I say “hemp” I’m referring to whatever it is you’re using for your line.  So here’s how I did it!  I tied a slip knot (if you don’t know how to do this, look it up online!  It’s pretty simple =]) Loop it over one push pin and tighten.  Loop the string to the other push pin.  Here’s another decision you get to make: I looped mine several times so I had four or five layers of string.  You don’t have to do that.  Stop whenever you have the look you want, cut the string, and make another slip knot for the push pin you end on!

Tip: You don’t have to make it look like a traditional clothes line, and you can do more than one line!  Amie has two, one right under another.  (I really love the way it looks.)  Mine’s a little different because I’ve already covered so much space on my wall.  I did mine diagonally.  I also know others who do them vertically.  Have fun with this!  Do it whichever way makes you happy =]


Step 4: Go back to the clothes pins.  Hopefully they’re dry! (If not, wait until they are to do this step.)  Take your permanent marker and decorate!  I kept mine pretty simple.  Using a fine-tipped marker I wrote words going down the length of the pins (Imagine, Laughter, Family, Friends, Smile, Enjoy, Life, Dream, Forever, Fun, Explore, and Happiness).  You can do something like that, or the name of the people in the photos, or little polka dots, or stripes, or music notes, or swirly patterns, or just about anything!  You can even leave them plain if you want!


Step 5: Organize the photos how you want them and pin them to the string!  And, like magic, you have an epic wall decoration that’s fun for you and others to look at!


Friday, January 21, 2011

Quilted Owl Pillow

So young grasshopper…you wish to learn something.  Something like what?  Quilting an owl, perhaps?  I’m not sure if you’re ready for that.  But that’s okay, I’ll teach you anyways. 

What you’ll need:
Pins
Strips of cloth (Personally, I chose strips.  If you prefers squares or scraps, that's fine too.  I think triangles, especially, would be adorable.)
Thread (I used a bunch of different colored thread out of one of those $1 sewing kits…why not, right?  It’s quilting, everything’s a different color anyways.)
Two buttons (For the eyes…so doing tree-buttons might be kinda weird.)
A remnant of whatever size you want your owl to be (Remnant: you can get it at most fabric shops pretty cheap.  It’s the cloth they have left that’s too small to sell by the yard.)
Needle <---pretty important
Stuffing (or fluffing, if you prefer!)
And this pattern here:

About this pattern: it’s a shaky sketch.  Obviously, it was done on the computer.  When I made my first one I used a large sketch pad (18X24) and cut everything out separately.  They’re all pretty basic shapes.   

The wings look a lot like scalene triangles with the long end rounded. 
The body itself is oval-esque with a stubby top and two triangular ears. 
The eyes are circles, and I used an extra circle cut in half to do the feet. 
The belly is simply an oval. 
The last bit, the beak, I did as sort of a caving diamond – if you want to simplify it, a triangle will work just as well! 

Tip: with the ears, eyes, feet, and wings, only cut out one shape as the pattern!  That way, they all come out symmetrical.  

Now we get to the fun part! (Actually my least favorite part).  You get to pin the fabric to the pattern!  I would personally start with the main body.  Make sure you overlap the fabric enough to sew the scraps/squares/strips together.  Then, once the fabric is pinned, you trim it to the proper shape.

Tip: I did the wings with vertical strips as opposed to horizontal.  It gave it a more homey look!  Also, I avoided using yellow for anything but the eyes, feet, and beak.

Once the fabric is trimmed, you can unpin it.  I unpinned mine one strip at a time to keep it in order!  This is where the sewing starts.  Putting your first two scraps of cloth together FACE TO FACE (That means bright side to bright side, front to front!) Start stitching along the first border.  (I poked a hole and then looped the thread over the seam and then poked a hole in the same side as the first hole.  Make sense?)  And now, dear friends, you have the beginning of your owl!  Follow the same procedure all the way up (or down if you started on the top!) the rest of the body.

Next, you do the same thing to the wings!  And, trying to make it as even as possible, you stitch them to the sides of the owl (keeping it Face-to-Face so the seam isn’t all shredded and gross looking).  I did mine about a third of the way down from the top.

From here on it’s pretty easy.  The ears are probably only one piece of cloth each, so they can get stitched on without the hassle of being quilted first!  

The belly on my owl was two pieces of cloth.  The reason I did this was so it would have a thin border: it’s just two ovals, one slightly smaller than the other.  The smaller one get’s stitched on top.

The eyes should be looking in the same direction, unless you purposely make your owl face two different directions.  When you sew the buttons to the circles, think about your positioning!  (I make an ‘x’ when I sew buttons – I stitch through diagonal circles a few times, and then stitch in the other diagonal a few times before tying it off.)

The beak and the feet don’t need any preparation after they’re trimmed.  

From here, you just pin the pieces to the owl and sew them onto the front! It should look something like this:
And now, the easiest bit!  Tape the pattern wings and ears to the pattern body and pin your remnant to it.  Cut in the shape of the owl.  FACE TO FACE sew the remnant to the quilted front of your pillow.  Make sure you leave enough of a gap to flip the owl right side out.  When the owl is flipped right side out, stuff it full of the fluffing.  Now, pinch the gap together and quickly finish sewing it.  Voila!  You’re very own Quilted Owl Pillow! =D

(This was the first one I made.  Please don't hate on it's lumpy form!  I wasn't well-versed in the art of sewing fabric neatly at the time, haha!)

Enjoy your pillow!